A Guide to Re-spoking Wire Wheels
Many older model cars have spoked wheels and these have been notoriously difficult for kit manufacturers to replicate realistically. Although modern technologies have helped enormously if you are modelling an older kit then you’ll probably want to improve the wheels. Through pictorial examples and thorough explanation we will show you several methods to re-spoke wheels without costing the earth.
Detailing the making of wire wheels for four specific car model kits.
• 1911 Vauxhall Prince Henry car. Airfix 1/32nd scale kit.
• 1945 MG TC Sports Car. Revell 1/24th scale kit.
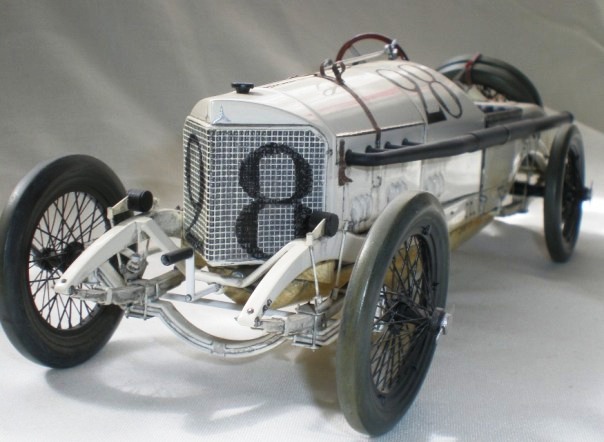
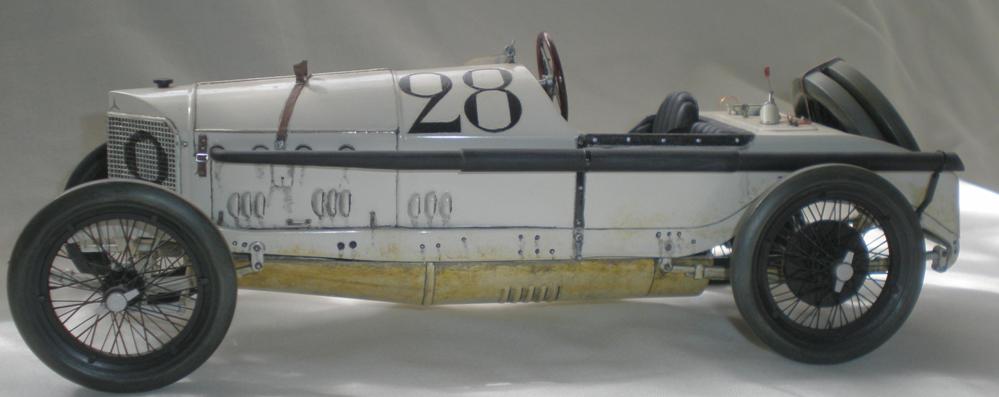
• 1914 Mercedes Grand Prix Car. Johann 1/16th scale kit.
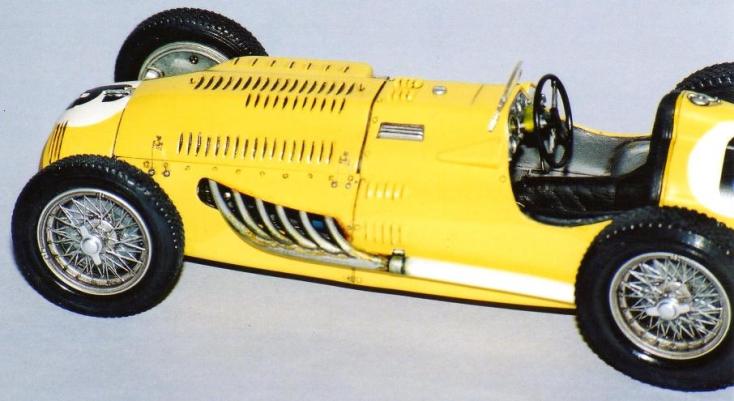
• 1950 Lago Talbot T26. Heller 1/24th scale kit.
• Pictorial guide to making bicycle type wheels.
The 1/24th scale Talbot-Lago T26c, below, is from the Heller kit. The subject of a detailing article with the museum site.
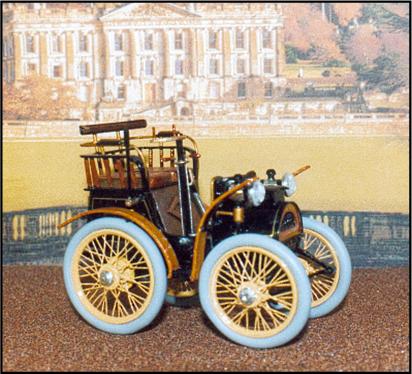
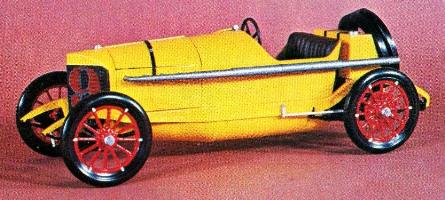
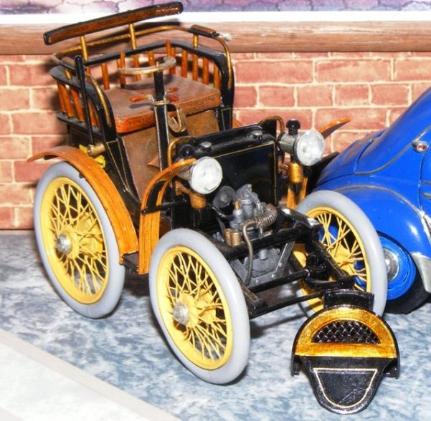
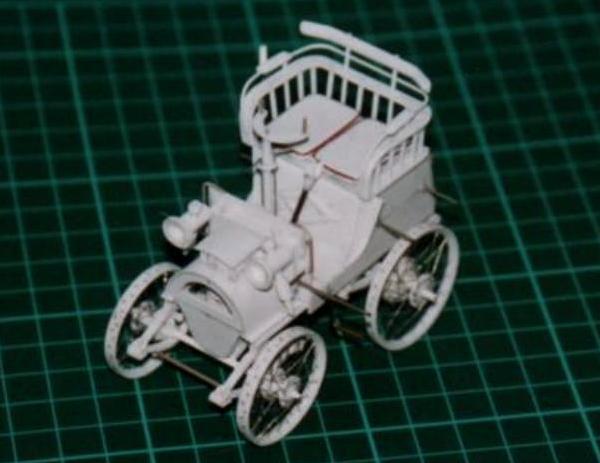
Featured above right is a scratch built 1899 Renault type ‘A’. This model has 40 spokes in each wheel. As the hubs are too small to allow the drilling of 40 holes, only 20 were drilled and the spokes attached at the rim, then taken through the back of the hub, and out the front to another rim hole, alternate spokes taken in front then in back of hub to enable overlapping.
Over the years we have replaced the plastic spokes in wheels with wire spokes on several model cars and built wire spoke wheels for scratchbuilt models. This article details the methods we used in re-spoking four quite different models.
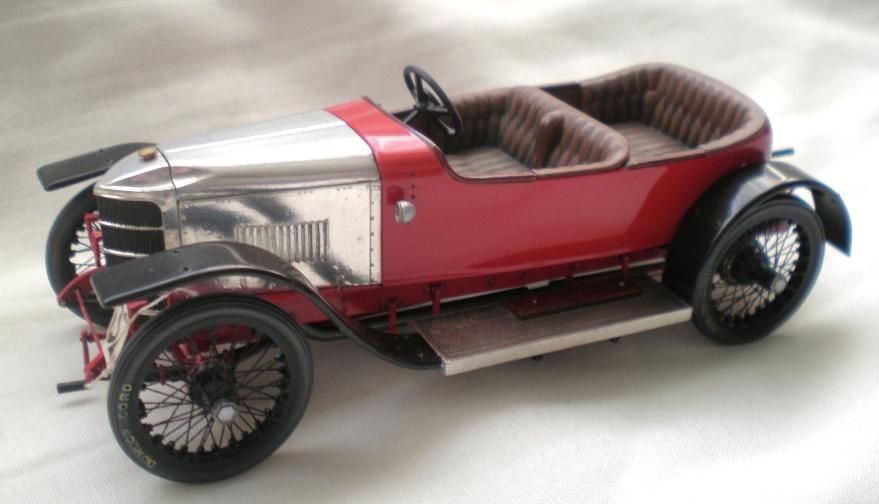
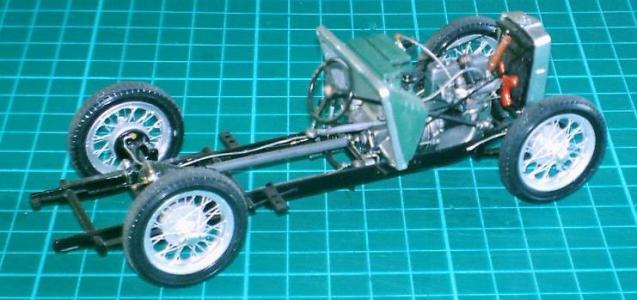
The first subject is the 1/32nd scale Airfix kit of the 1911 Vauxhall "Prince Henry" car. This is a nice kit and has good spoked wheels for the era of the kit, however, they are grossly over scale and unrealistic, so it was curiosity and the search for more realism that led to this re-spoking project.
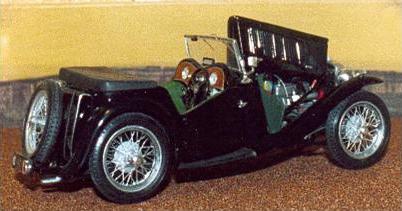
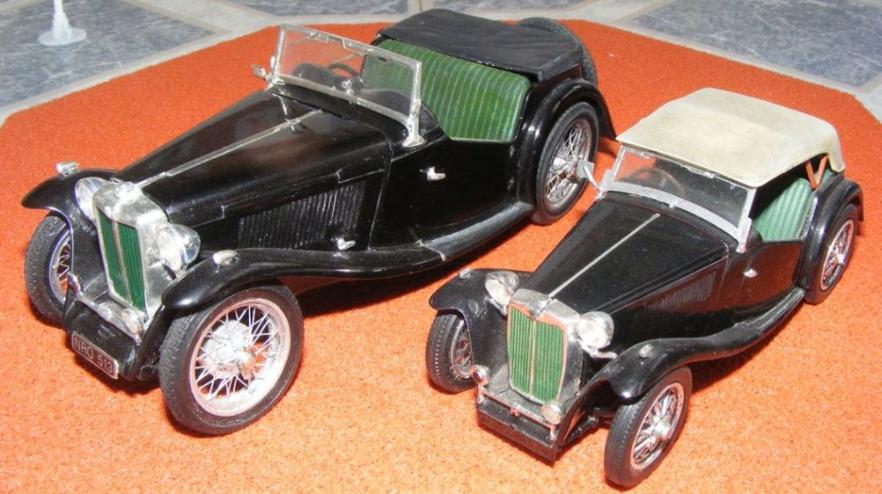
The second model detailed is the Revell re-issued Monogram kit of the 1945 MG TC sports car, a nice kit considering the era that it first appeared in. It benefits greatly for having wire wheels fitted.
The third, and most difficult project, is the 1/16th scale Johann kit of the Mercedes 1914 Grand Prix car. The kit came with artillery wheels that were clearly wrong, so re-spoking was a necessity.
All these projects require patience and time but very different techniques, so we deal with them individually.
We do not consider ourselves to have any special modelling skills and are not engineers by trade. We just enjoy making model cars of any era. The hardest part of re-spoking wheels is the decision to do it! Once you start cutting out the existing spokes you are committed (many people said we should have been!).
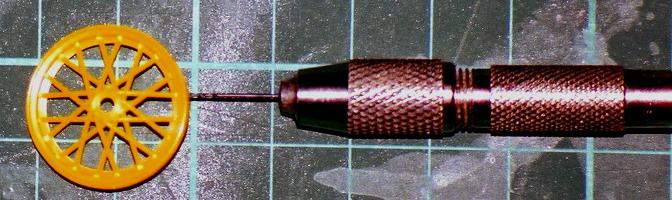
1911 Vauxhall “Prince Henry” 1/32 scale Airfix conversion. by Ian.
This is the easiest conversion detailed because the kit wheels already have moulded spokes which only need replacing with wire spokes.
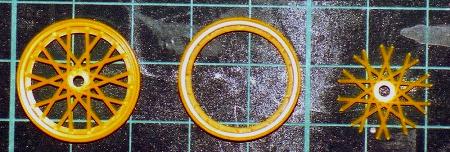
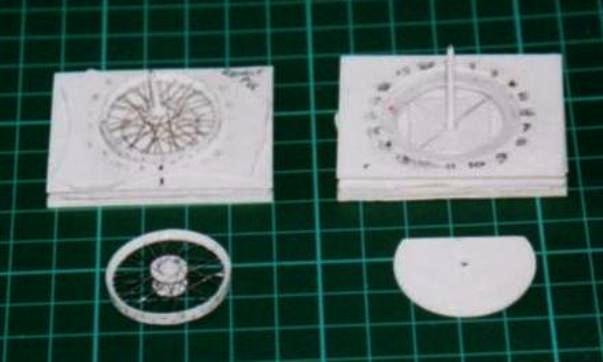
The wheels also come in two halves, a flat back section and a dished front section with a moulded tyre to fit between the rims making the project easier still.
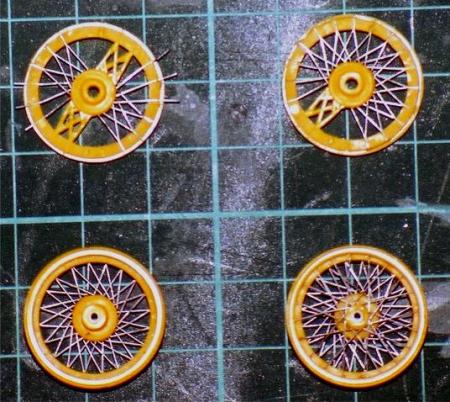
Start with the front dished section by cutting out a few pairs of spokes, but leave three pairs equidistantly spaced around the wheel, never leave less than three pairs or you can pull the wheel out of shape. The marks left where you removed the spokes will serve as a location point for drilling as shown.
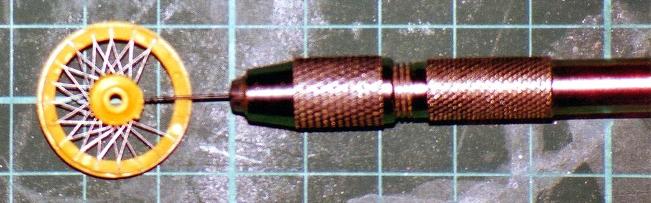
The moulded spokes are slightly thicker and shouldered at the rim providing a spoke nipple. File up to the nipple but leave it intact then drill through this nipple.
Using 5 amp. fuse wire, rolled straight, make individual spokes and ‘super glue’ in place following the pattern of the moulded spokes you left in place. Once these spokes are in place you can turn your attention to the flat inner side of the wheel.
These are approached in the same way leaving three pairs of moulded spokes intact till later, but the wider flange on this part allows for you to drill the holes alternately to the front and the rear. Drill part way through at the foot of each spoke on the front of the flange, then turn over and repeat at the foot of each spoke on the rear of the flange. I then found that I was linking up with the front holes, so to make life easy I drilled 12 holes straight through at the foot of each front spoke.
The Vauxhall kit hubcaps consist of a plastic ring so I put photo-etch (P.E.) hexagonal shapes on these to give the impression of a nut head for a spanner to fit over.
I was surprised as to just how strong these wheels are, given that only thin 5-amp fuse wire was used, but I left the wheels free to rotate in order that each time the model is moved the load will be re-distributed around the wheel.
These wheels took four hours each to make. Patience you need in abundance but if you have a go you will find it is not that difficult and well worth the effort expended.
Replace the plastic spokes going front and rear of the flange as the pattern on the kit wheels and as they do in reality. You will notice that all the front spokes go one way and the rear spokes the opposite way and that due to the thickness of the flange on the kit part they look almost dished, do not worry, once the front is on and it is all painted and on the model it does not notice at all and does give lateral strength. If you wish you can thin down the flange.
Now return to the front half of the wheels, cut out the remaining spokes and replace them with wire spokes as you did before. Take extra care not to deform the wire spokes while you are handling the part. Finish the inner half in the same manner.
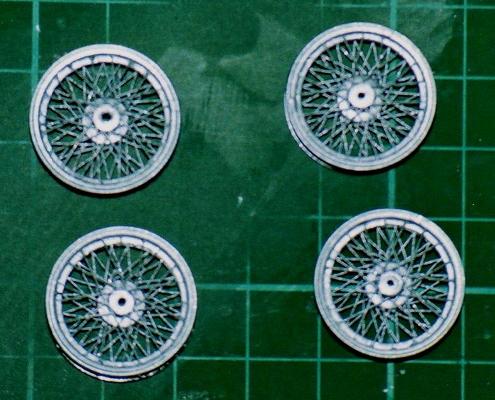
Put the two halves together, remembering to sandwich the tyre in between, paint Satin black or the body colour as required, paint the tyres and you have just three more to make, or five if you want two spares.
1948 MG TC Revell 1/24th scale kit. by Rod.

Do understand that once you start this project there is no going back, so I suggest you read through the instructions first.
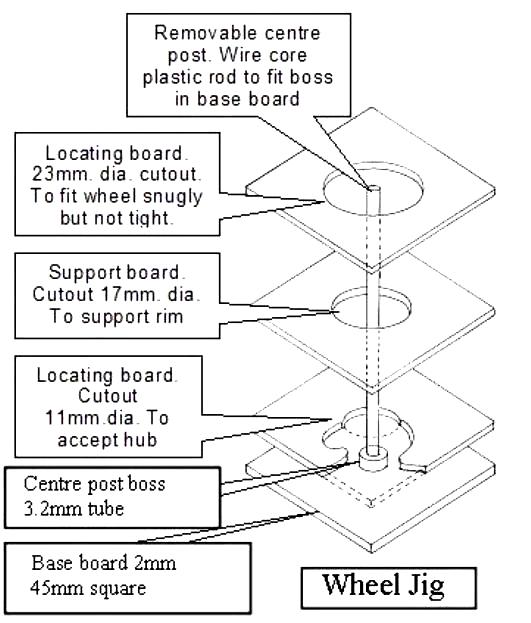
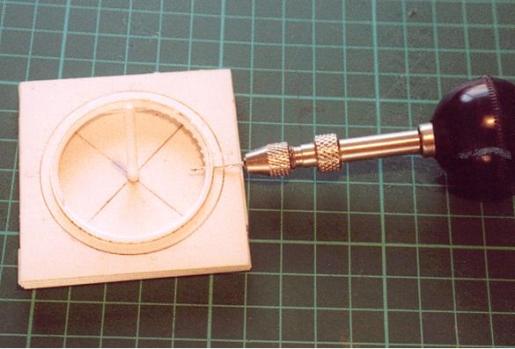
To build these wheels you will need to make a simple jig. See the diagram below. The baseboard should be 2mm. thickness Plasticard, other boards 1.5mm Plasticard. Board should not be less than 45mm square. Cement boards together, checking that wheel and hub fit each board. In principle, a similar jig and method could be use for fitting wire spokes in two part wheels on other models.
BUILDING THE WHEELS.
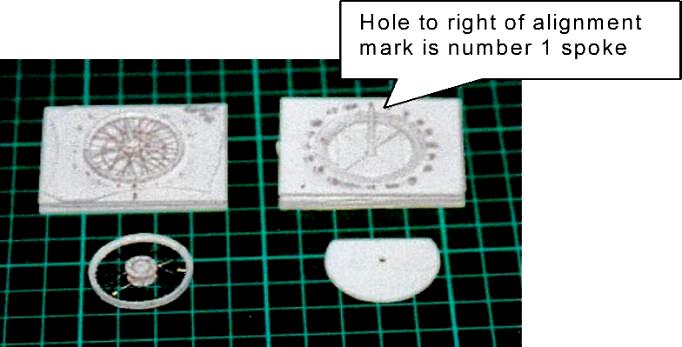
The wheels come in two halves, an inner and an outer half. Start with an inner half and cut through and remove the spokes at the rim and at the hub. Discard the spokes but retain the hub. Remove the engraved spokes on the hub with a flat file and finish off with a triangular file to make a groove round the hub for the new spokes to lay in (see diagram).
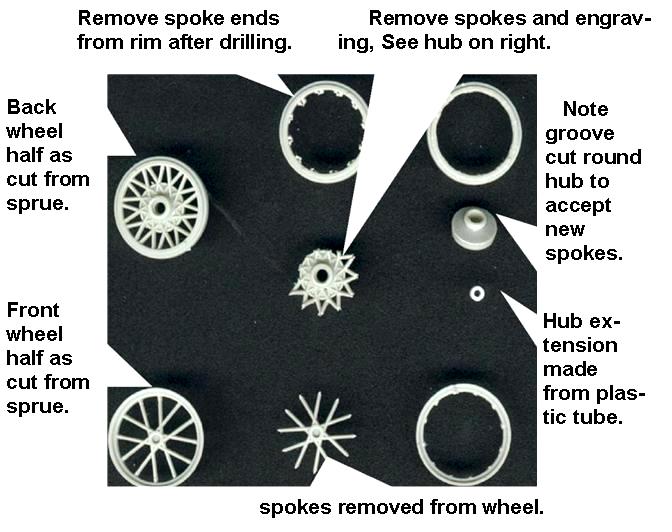
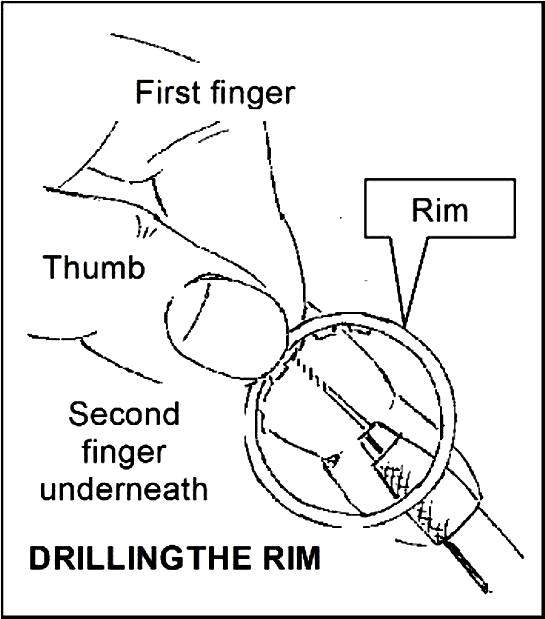
Hold the wheel half, well side up, between the first finger and thumb, thumb uppermost, at the point where the hole is to be drilled. (See diagram on right). Approach the wheel with the drill from underneath the rim on the opposite side to the hole to be drilled. This way you can support the rim and the drill chuck with your second finger. Take particular care when drilling through by the wheel rim locating holes and pegs on the mating sides of the wheel halves.
Clean up, but leave a small stub of each spoke at the rim. Make a ‘pilot’ hole, with a pointed tool in each stub and then drill through the 24 spoke stubs into the wheel tyre well. This is the most tedious and difficult operation.
Take an outer wheel half, cut through the spokes at the rim and discard the spokes and wheel centre complete, again leaving a small stub on each spoke at the rim. Clean up and drill through the 12 stubs as for the inner half.
Holding the two halves together make with a pencil or marker an alignment mark on both rims by the locating hole and peg. This mark is important as a starting point for threading the spokes.
Make four hub extension tubes from 1/8 in. (3.2mm) diameter plastic tube 3.5 mm long. These must fit into the original kit hub and may need trimming before securing to the wheel when it comes to assembly. Do not secure at this stage.
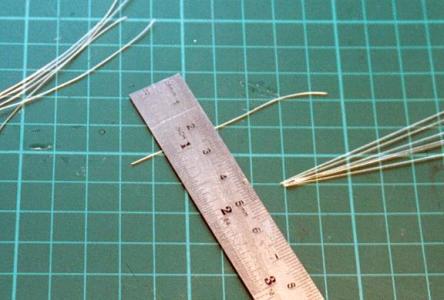
Prepare your spokes from 5 amp. fuse wire. Cut twelve 35mm. lengths for the inner half and 12 lengths for the outer half. Roll each length on a flat surface with a steel rule or the like to remove bends and curves.
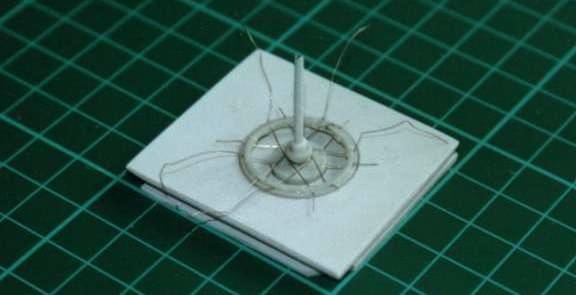
Lay the inner wheel half into the jig and position, but DO NOT cement, the hub extension tube over the jig centre post. With the alignment marks in the 12 o’clock position the spoke immediately to the right of the mark is spoke no.1, proceeding round clockwise to No.24. From the outside of the rim thread the first length of wire through this hole, then from inside the rim draw it to the right (clockwise) of and around the hub, making sure it lays into the filed groove, and then out through hole No.14, but DO NOT secure.
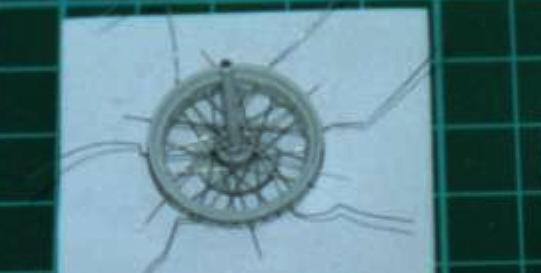
Draw the spoke wire through to leave a short tail end on the outside of hole No.1 and a long tail end at hole No.14. This arrangement will straighten the spoke and prove useful for identification when it comes to securing the spokes.
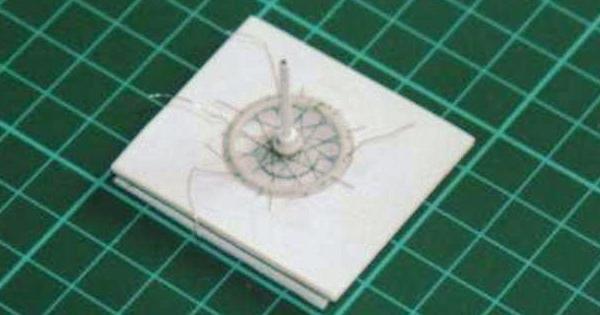
Count the holes round very carefully as any mistake at this point means taking it all apart and starting again. DO NOT secure any spokes until all are in place. Repeat this process at hole No.5 and draw through to hole No. 18. Repeat for holes Nos.9 – 22, 13 –2, 17 – 6, 21 – 10, 3 – 16, 7 – 20, 11 – 24, 15 – 4, 19 – 8 and 23 – 12. Note that each spoke should enter at an odd number hole leaving a short tail and exit at an even number hole leaving a long tail.
Now secure with superglue all the spokes at the short ends only, placing glue only in the tyre well and not inside the rim. When secure draw the spokes tight by pulling on the long tails and securing in the tyre well. When set and secure trim off the tails and clean up.
Turn the completed inner half of the wheel over in the jig and align, by the marks, the outer wheel half with the inner half and check that the rims meet flush together. Adjust the length of the hub extension tube if necessary. Secure the two halves with plastic cement.
Starting at hole No.1, i.e. the hole immediately to the right of the mark, thread a spoke wire and take to hole No.8, then 3 – 10, 5 – 12, 7 – 2, 9 – 4 and 11 – 6. Again use the short and long tail method. These spoke wires have to wrap clockwise around the centre post of the jig resting on the end of the hub extension where it forms a shoulder with the centre post. Secure the spoke short tails, then when set, secure the long tails as previously. Ensure that the centre post remains vertical and that all spokes are tightened evenly. Sorry the Photo's aren't brilliant but we're sure you get the idea.
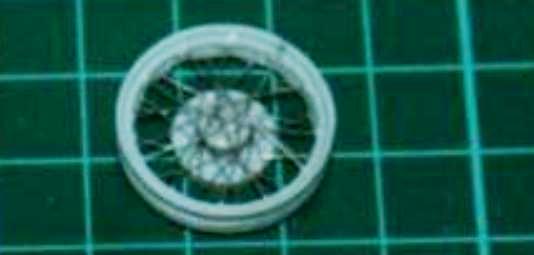
Very carefully remove the jig centre post with the wheel still in the jig. Secure the spokes on the end of the hub extension with a sparing amount of super glue and introduce liquid cement between the hub and the hub extension tube. When fitted, the ‘knock off’ hub nut will hide the spokes secured on the end of the extension tube. Trim the spoke ends and run a triangular file round the tyre well to clean up.
You will probably be surprised at the strength and rigidity of the finished wheel, but do take care when fitting the tyre. Fit the wheel to the axle and secure the ‘knock-off’ nut.
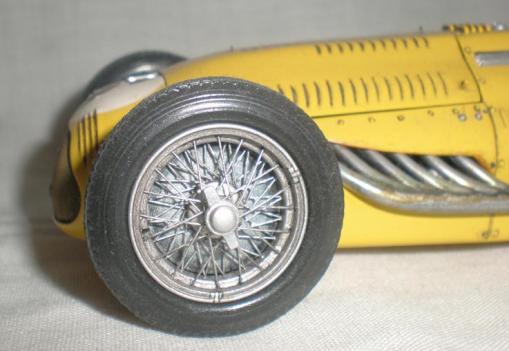
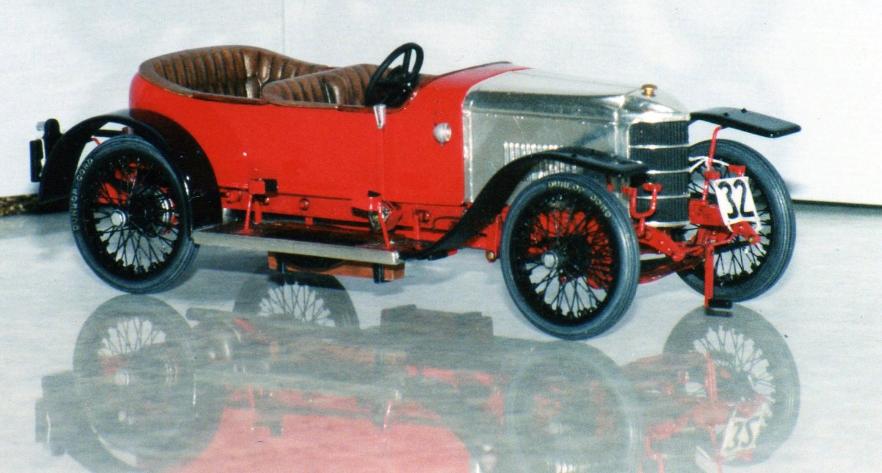
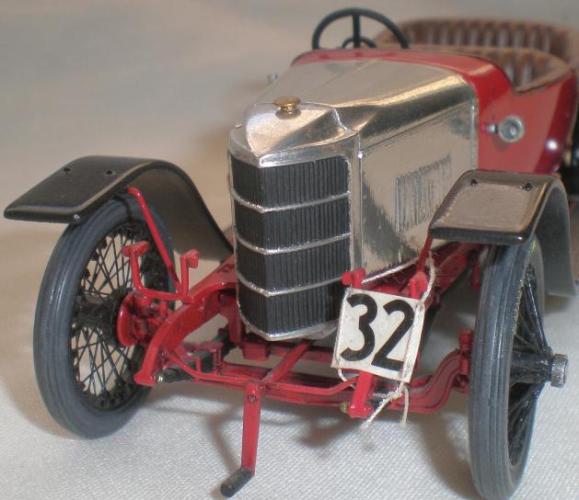
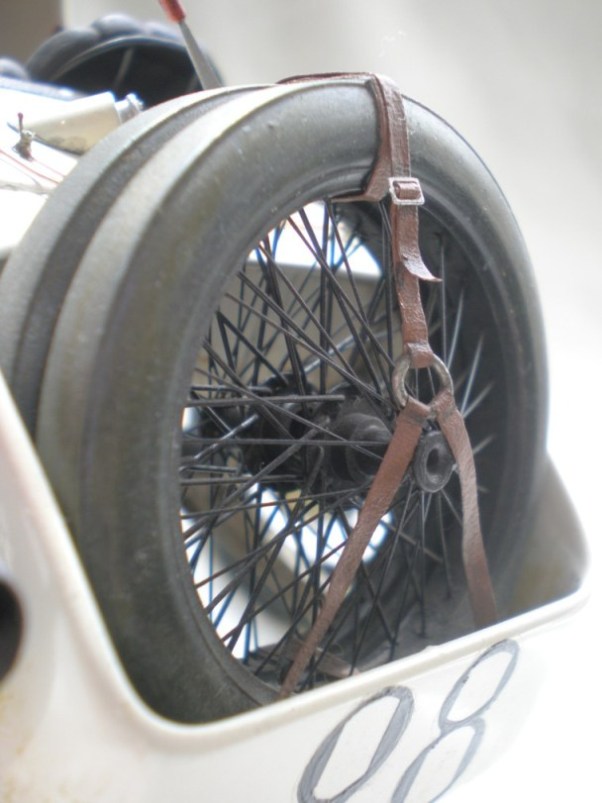
1914 Mercedes Grand Prix car, 1/16th scale Johann kit. By Ian.
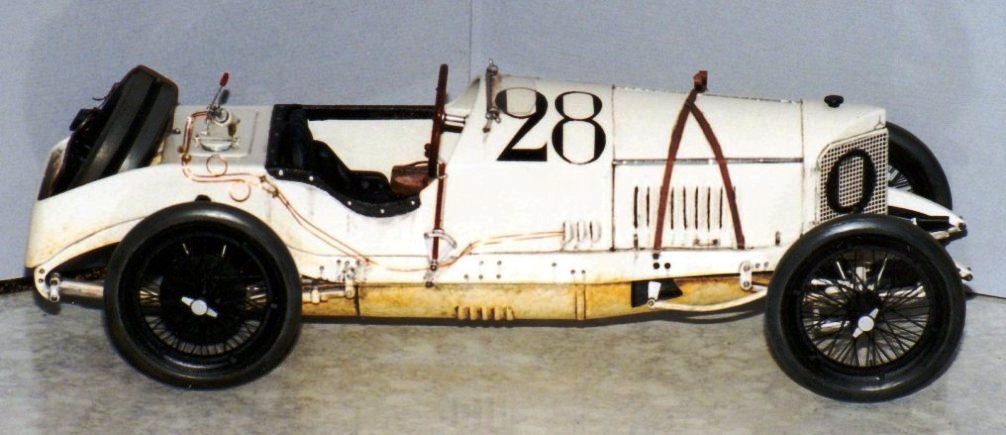
The kit as originally presented with artillery spoked wheels, short bodywork, squared fuel tank and very little detail.
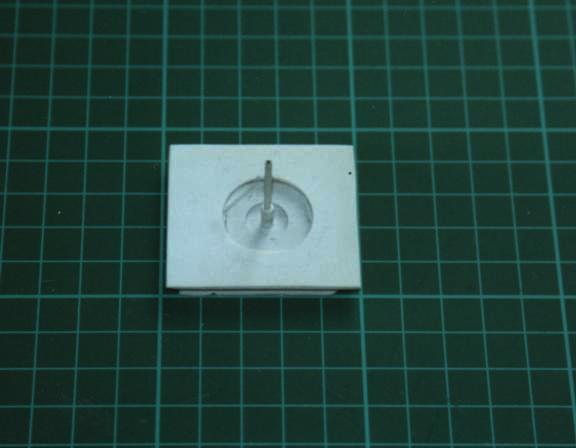
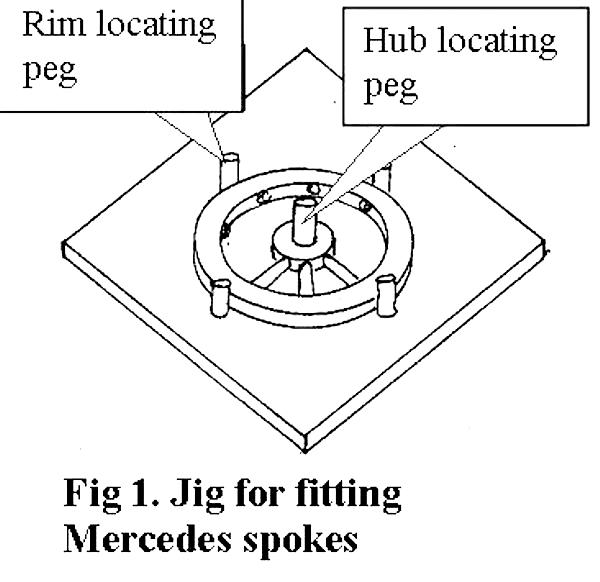
In re-spoking the Mercedes wheels I needed to plan ahead far more than for the Vauxhall. I required six complete wheels for the model; four road wheels and two spare wheels, but the spare wheels in the kit had no hubs or spokes so these would have to be scratch built and I would need to totally remove the hubs from the road wheels.The wheels being a one-piece casting, hub, spokes, rim and tyre. I made a simple jig (Figure 1) to hold the hubs and rims during the spoking process. The diagram is self-explanatory and can be made quite easily.
As I said, a very basic jig which proved to be all that was needed. The wheels seem to have turned out ok though.
Below is the process I adopted to turn artillery spokes into wire spokes.
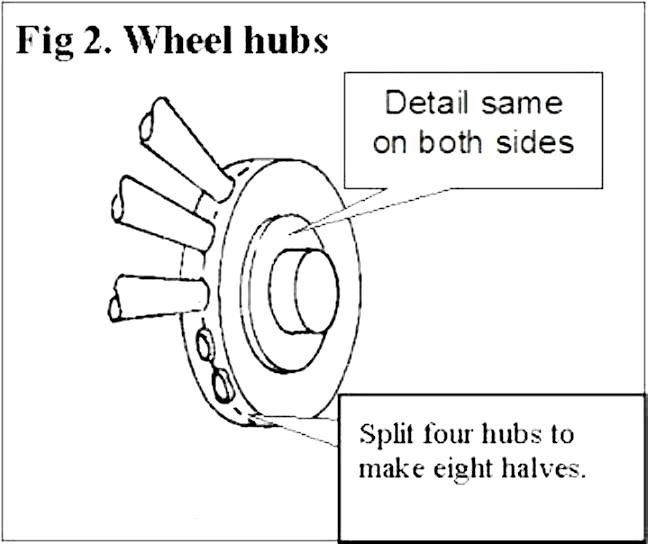
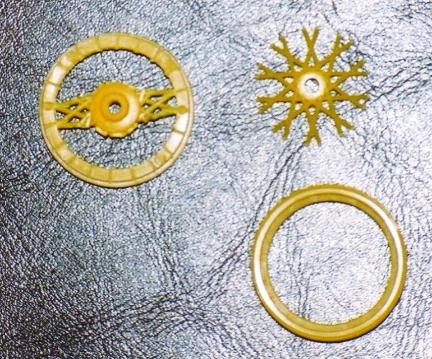
I started by removing the spokes, thus separating the hub from the rim. Needing six hubs I split the wheel centres in half to obtain additional hubs, the detail being the same on both sides (see Figure 2).
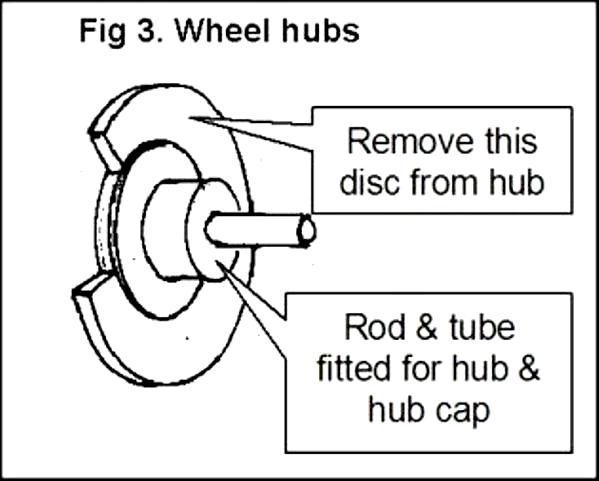
Firstly they had to be measured for thickness so that new centres and front flanges could be made from plastic tube and card, to the required depth to give the correct dishing. I ended up with what looked like eight tubes each with a flange front and rear (see Figure 3).
Now on to the drilling; each of the flanges has to accept 24 spokes and the mathematicians among you are now thinking 24 rear spokes, 24 front spokes that’s 48 spokes a wheel and you are correct. You would also be correct in thinking there should be 56 spokes…however; there are two good reasons for staying with 48 spokes. Firstly, the kit wheels had 12 wooden spokes moulded so I could use the moulded spoke stubs to help with measurement, secondly, to fit 56 spokes requires pin-point accuracy in order for the spokes to cross-over each other without distorting. The 48 spoke layout gives a realistic impression and no one has commented adversely yet, but it is up to the modeller how far they want to go with authenticity. It is possible that the front wheels only had 48 spokes anyway.
Having drilled the flanges I made new centres to the required depth and inserted a small core in the end for the hub knock-offs to fit over. At this point I decided to simply lay the front ‘dished’ spokes up to the top of the hub centre rather than try to drill 24 holes in a tiny flange (my first attempt to do so ended in dismal failure), the hub ‘knock off’ will hide this when the wheel is completed.
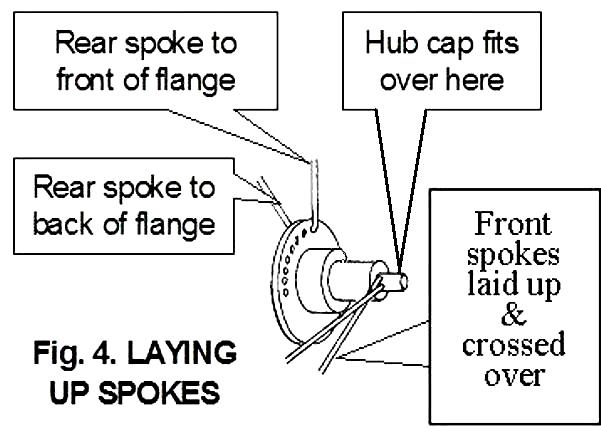
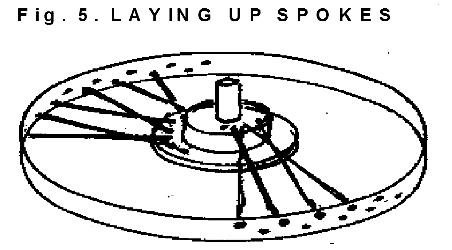
Now for the rims, as previously stated the 12 wooden artillery spoke stubs will be helpful in measuring the distance between spokes. The pattern I followed is a ‘staggered’ one and best illustrated in figures 4 and 5.
With rims drilled for the 48 holes pattern I could now file and sand off the stubs of the moulded wooden spokes.

I now had one completely drilled wheel rim so I started marking the ‘spare wheel’ rims by placing them side-by-side with the drilled wheel and scribing a line across with a sharp blade, then by taking depth measurements from the drilled wheel I could transfer these to the ‘spare’ rim and mark the position of each hole ready for drilling.
It is worth mentioning that if you use a drill ‘bit’ slightly larger than the diameter of the spoke, you do not have to be quite as accurate with your drilling and you can move the spoke around within the hole to give the best visual position and appearance. I know the ‘purists’ will be tut-tutting but you need to make things as easy as possible in jobs like this. Rest assured that once the ‘Super-glue’ fills the space and the whole wheel is painted it will all look fine.
After sanding the inner rims to remove the moulded spoke stubs, I had six sets of hub and rim combinations, so now we need the jig to put it all together.
Now a word on the selection of suitable wire for making the spokes as obviously it is a compromise between strength and scale thickness. I found various thickness of brass wire available from my local model shop. Fuse wire is readily available in three grades, 5, 15 and 30- amp. Picture hanging wire has several filaments and can be unwound. On this model I used a slightly thicker wire for strength on the inside spokes and a thinner gauge for the front dished spokes. All lengths of wire cut for spokes will need to be ‘rolled’ on a flat surface under a steel rule or similar tool to obtain perfect straightness.
The pattern of spoke layout will depend on the car or wheel manufacturer so you will need to refer to your photo’s. Generally spokes are laid in sets of four, two spokes on the rear flange and two on the front. Occasionally maker’s use more spokes on the driven wheels than on the steerable wheels, this is because greater strength is required for the driven wheels, while strength can be sacrificed for lightness on the steerable wheels.
I needed to cut and make each spoke individually to fit, this was due to two factors, first, I could not wind the wire in and out over the moulded on tyres, or other spokes and second, it is not possible to drill by hand all the holes accurately to the same depth. I started by laying the rear pattern first, once a couple of spokes are in place you will soon get the idea, but do concentrate as things can easily go drastically wrong. Removing one ‘super glued’ misplaced spoke can damage several other perfectly placed spokes.
The rear spokes are laid flat, but the front sets are “dished”.
Refer to diagrams 4 and 5 to see how I dished these spokes. This will lead them to ‘lay’ against each other but the hub ‘knock off’ will cover this area. On the spare wheels a ‘polo mint’ disc was used instead of a ‘knock off’ to cover the spoke ends and give the impression of a hollow hub for the axle to fit into.
Finally the kit did not include ‘knock offs’, only plain caps, so I made four matching sets of ears from ‘Evergreen’ strip and then hollowed out the backs of the caps to provide a snug fit to the wheel.
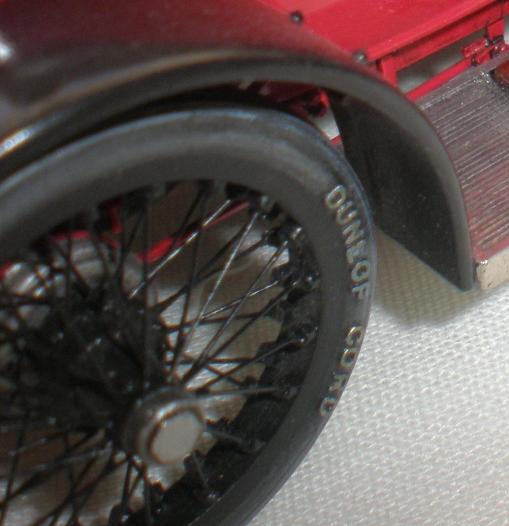
Tyre valves were fitted as in reference photo's.
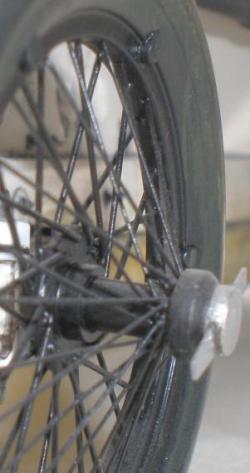
Each of these wheels took about five hours to make so it was very labour intensive, the end result was worth the effort as I could not have accepted the Artillery spoked wheels on this car. I would like to finish by saying that although it is time consuming to do this sort of thing it really isn’t all that difficult.
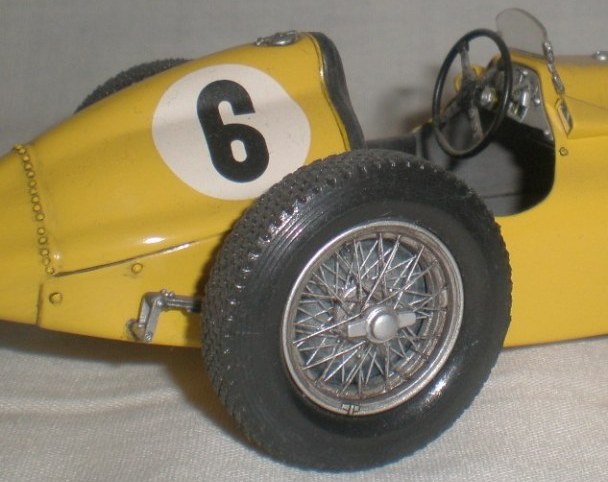
1950 Lago-Talbot T26 GP car, 1/24th scale Heller kit By Ian.

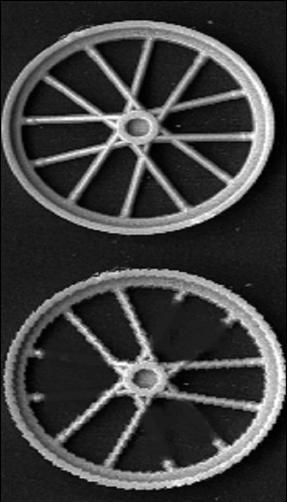
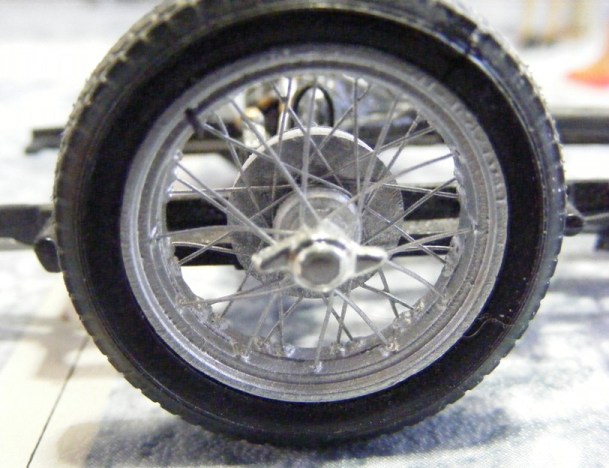
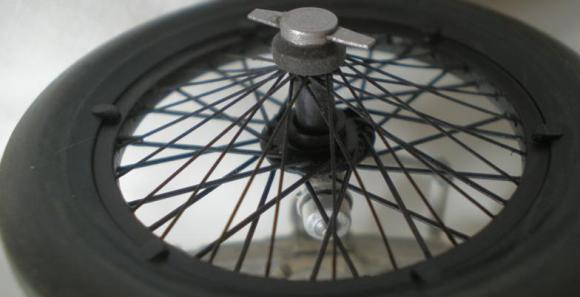
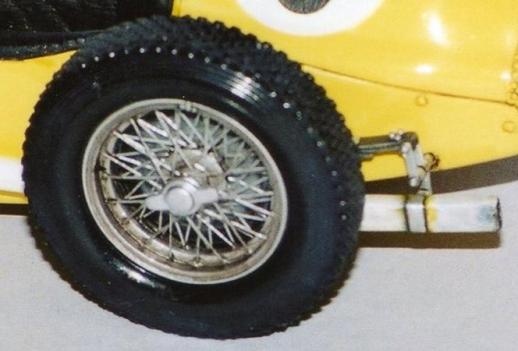
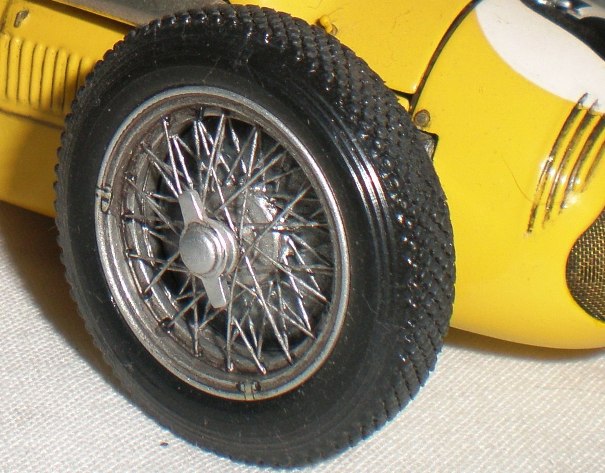
The Heller T26 is a lovely kit and cried out to be detailed, an in depth article can be found in the projects and articles build. Part of this super-detailing was the upgrading the wheels. Although the plastic spoked wheels in the kit were not bad the photo on the right shows just how much thicker the spokes really were and what a dramatic improvement was made by replacing them 5amp fuse wire spokes.
What follows is a description of how this was done.
The kit wheels are in two parts, a front dished set of spokes and a flat rear which also contains more spokes. Each half needs to be treated differently.
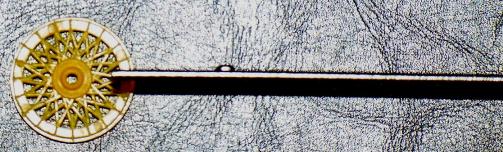
The first job is to drill through the rim of the front half of the wheel as in the photo. This should leave a white mark at the base of each spoke where the plastic has been stretched.
Once all the spokes have been drilled carefully remove them and clean up the rim. Save the spokes to help you remember the pattern & which spoke goes on top.
The easiest way to deal with the rear half is to saw into the rim at the point where the two spokes meet. Saw deep enough to allow two spokes to slide down into it but don’t go to deep, see photo.
Do not cut out all the rear half spokes as you can use them to hold the hub centrally, saves making a jig. Drill a hole into the hub where the spokes meet. Remember to drill it a little bigger than needed as you will be putting two spokes into that hole too. See photos. Clean up the rim and hub ready to fit the spokes. Make up the spoke sections as in the photos using another wheel to help maintain the pattern. Use 5amp fuse wire for the spokes, roll the wire on a flat surface under a steel rule to make the spokes straight, secure with drops of superglue.
Once the rear half has been done drill and clean up the hub from the front spokes. I used some evergreen rod to fit inside the hub to help locate the front hub part.
Take time to position it correctly so the spokes will line up in pattern.
Now glue the front rim to the completed rear wheel half. There is a pip and recess to line up the kit parts so you know you will line up correctly. Feed spokes through the holes and into the hub following the pattern on a kit part or one you have completed already. This process, like the other respoking jobs, is a bit tedious and fiddly, but well worth the time and effort.
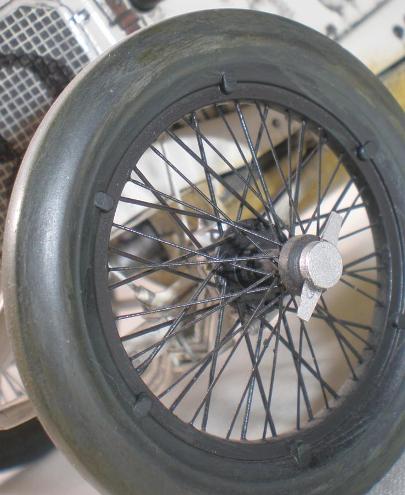
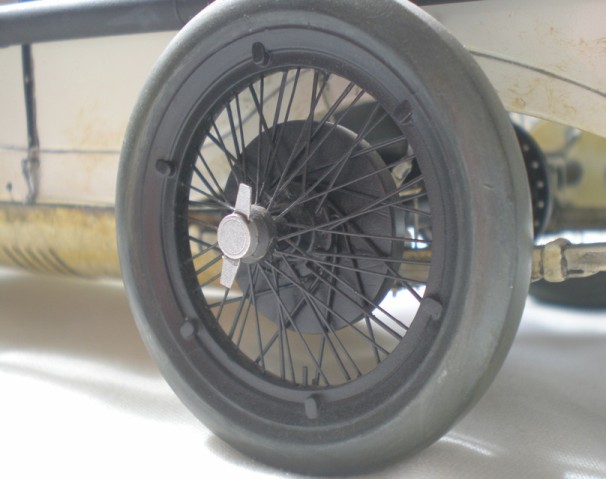
The completed wheels on the model speak for themselves.
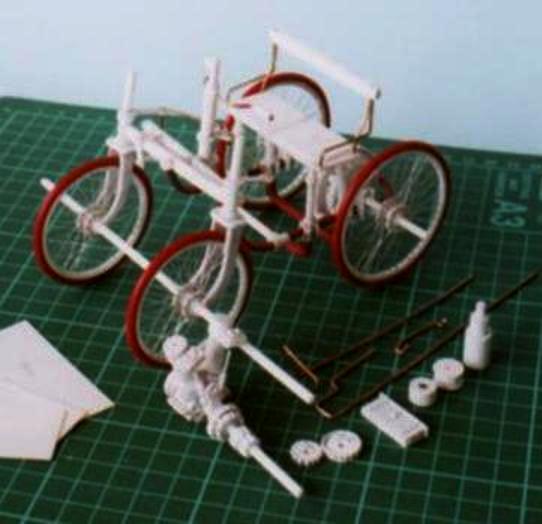
Pictorial quick guide to making bicycle type wheels by Rod.
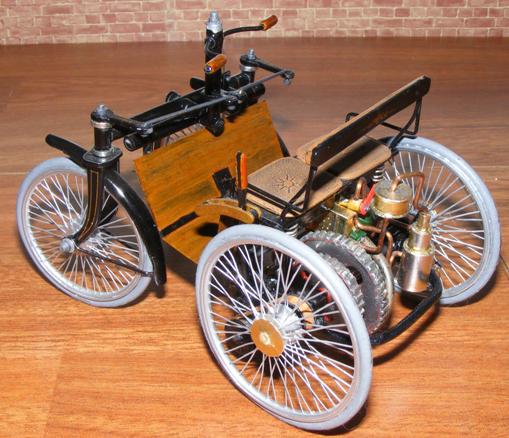
Subject is a model of 1888 NSU Daimler having direct spoked bicycle type wheels

Step 1. Make a jig along the lines to that described earlier in the guide and as in illustrations on right.
Step 2. Select suitable plastic strip for rim. Position this in jig to establish length, chamfer and overlap joint. Mark spoke positions with dividers, make a starter hole for drill bit. To find required distance between spokes divide length of rim strip by 360o.
Step 3. Make hubs. You will only need half the number of spoke holes, as you use hole at hub for two spokes.
Step 4. Position strip of ’half-round’ inside the rim for strength. Use overlap joint and position opposite rim strip joint. Drill thru’ rim again and ‘1/2-round’ for spokes.
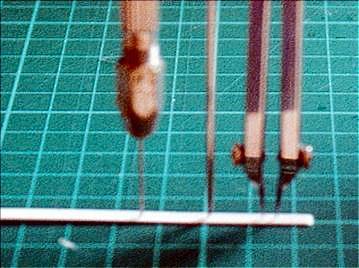
Step 5. Cut spokes to length and straighten.
Step 6. Position spokes by inserting at rim, take thru’ hub from inside and take back to rim. Note spokes alternate between hub ends.
The wheels for the car below, a 1889 Renault Type 'A', were made in the same way. As you can see from the photo’s the grouping of four spokes is well replicated.
I hope we have given you some ideas and confidence to have a go at this sort of work. We know what it feels like to think "I could never do that", we've been there too.
It is time consuming, it is fiddley, but it is also more than possible and makes a great difference to a model.
Have a go on something small and build your way, expect a few wobbles along the way that's how you learn, but keep at it.
You'll surprise yourself.