Continuing the article on how to build a model car we are now moving on to cover glues, building sub-assemblies and storing them during the build process.
Whichever glue, filler or paints you are using be aware that they are all chemically based. You must read the directions for the product’s and follow the safety advice for each product.
A quick word on glue.
Once again there are several options available here. Some beginners kits come with a tube of glue, or “styrene cement”, in the kit. Years ago this was the only type of glue available. Now you can buy many different brands of liquid cement which you can apply by brush, toothpick or even tiny pipettes.
All the styrene adhesives work by softening the plastic surfaces so the parts can weld themselves together, it stands to reason then that gaps cannot be bonded! We’ve talked about fillers but styrene tube glue does not make a good filler.
Revell’s “contacta” glue, or similar, which have a precision applicator are a good way to start off. This is a medium viscosity liquid glue that will run freely enough to use capillary action to spread itself along seams. As with all glues, you must keep the nozzle clean and always replace the cap.
There are several makes of liquid cement, often they have a brush attached to the cap however these are usually too big to give accurate application. Spilled liquid glue can ruin the surface of the plastic leaving behind fingerprints and obliterating detail. We prefer to use a small paint brush dedicated to the job as liquid glue, when accurately applied, is the best way to attach parts. Remember the parts must be in contact with each other so the plastic can weld together. Liquid glues usually dry quickly and certainly more quickly than tube cement. Where possible you should apply liquid glues from the back of a part to avoid any spills on the visible surfaces.


A selection of styles of styrene adhesives. The tube is still readily available but arguably the least easy to use!
If your kit has “plated” parts in it you need to take a slightly different approach when it comes to gluing them on. Remember we said the cements work by softening the plastic surfaces so they weld themselves together, well they can’t do that with a layer of chrome plating in the way. You must always carefully scrape away the plating from the mounting pins so you get plastic to plastic contact. This point also applies to paint, if you have sprayed or brushed paint over the mounting pins, and into locating holes, scrape that away too.
Manufacturers plate the parts on the sprue so that the attachment points do not have plating on. Replacing this in a realistic way is very difficult but you will find some options later on in this article.
Also check your references too as often there are parts on the plated sprue that should not be plated and sometimes the shine on the plated parts is considerably more than in real life.


The whole front axel and suspension on this Bugatti come as one plated part. Although this is an area that does need to be bright it is also a place that becomes dirty quickly. To replicate this ink washes have been mixed with matt varnish and applied around the details, this brings the model to life and allows areas like the spring clamps at the front of each leaf spring stand out.
For clear parts you need to use different adhesives. Use of normal cements often ends with damage to the clear part, sometimes this can be rectified but if you can avoid a time consuming process then obviously you should.
So what to use to glue clear parts? The easiest and most readily available is the white PVA glue. The sort of white glue given away in flat pack furniture kits and sold in almost all shops as craft glue. It can be watered down and dries clear, is easy to clean if it spills and doesn’t spoil the clear part or any painted finish.
The method for attaching a windscreen for example would be to use a couple of tiny dots of superglue applied with a tooth pick, usually in the middle interior of the body so the clear windscreen is held in place then mix some PVA with water till it is milky and runs freely. Apply this with a thin brush to the corners of the windows and let the mixture run, by capillary action, along the joints.
If you accidentally spill more on than you need don’t panic, soak it up with tissue, this will lift most of the spill off the part. Once the glue dries you should be able to remove any further smears with gently rubbing. A further advantage of PVA is that if you do make a mistake it simply peals off without causing any damage to the surfaces it was on.
For more security, coat the window with clear acrylic varnish or Johnsons “klear” floor polish, now called "Future".
Many modellers have recently started going straight to the clear varnish as an adhesive and this can certainly work. Vallejo’s acrylic varnish is good but we have found that many ordinary artists acrylic varnishes are just as good and often offer better value for money.

This Lotus Cortina’s Windows, cut from clear sheet, were glued in with PVA glue and coated with Klear floor polish.
The 1939 Bugatti’s aeroscreen was attached with clear gloss varnish, as was the cover over the side light recess. Honestly there is a cover flush to the body as well as the convex lens.
Vac-form lenses and light covers are attached to this 1972 le Mans winning Matra with dots of superglue and secured with watered down PVA glue.
Tweezers.
Tweezers (or small forceps) are very useful for handling small parts when attaching or painting. Some ordinary household tweezers will be fine to start with. These are available in chemists and hobby shops and do not cost very much at all.
In time you can buy more specialist tweezers from hobby shops, over the internet or at model shows. Some have built in clips, or are spring loaded, to hold things without you needing to apply pressure, certainly saves your fingers if you are doing time consuming detail painting. Some are shaped to allow you to position things in tight areas or to hold parts that are oddly shaped.
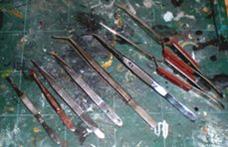
Here is a example of tweezers I use most often. There are two shapes of normal tweezers, two needle nose versions a large angled pair and three that are especially designed to hold the item for you.
As well as handling and positioning small kit parts they are very helpful with small decals and for fitting tiny photo-etch and wire detail parts.
Tweezers have been a great aid to shaping wiring, making buckles and fittings as well as applying and shaping bare metal foil. They really are extremely useful to the modeller.
Sub-assemblies.
As you work your way through the kit you will accumulate sub-assemblies. These units need to be painted, possibly detailed and kept safe until it’s time to put them all together. Test fit all the parts before gluing to make sure they fit, usually called a dry run or dry fit. We will cover painting on later, and detailing in another article, so for now here are some ways to keep your sub-assemblies clean and safe.
Re-sealable plastic bags or “zip bags” are very useful in keeping parts together but are not that protective, “Take away” tubs offer more protection but items can rattle around inside, combining the two offers the best option. The point is should something come unstuck it will not be lost as it remains in the bag and tub. I tend to leave the assemblies loose and easy to get at until all the work is completed then seal them in bags inside the tubs. You'll probably develop a system that works for you as you gain experience.


A selection of sub-assemblies. Painted and ready to put together, a Lago Talbot. Note the small re-sealable bag.
The rear suspension unit is off the EJ10 Jordan, it has been cleaned up and some gaps filled. next step is priming and painting, followed by decals.
The other two photos show sub-assemblies for a 2003-GA Ferrari stored in a plastic “take-away” tub and clear chocolate box. Depending on the fagility of the sub-assembly I may not need to combine a bag and a tub. A highly detailed engine unit willl certainly be put in a bag as well as the plastic tub as might highly detailed wheels, when building straight from the box with minimal detailing I'm happy to leave the finished wheels in the tub.
Decals.
You might be a little surprised that I am mentioning decals before the painting process. But the fact is many manufacturers now pay such close attention to detail that there are decals that have to be applied at the sub-assembly stage, some would be almost impossible to apply after the car has been put together.
This should have been identified at the planning stage as these days most manufacturers use a symbol to prompt you to apply a decal at a particular point in the build instructions.
You did read the instructions didn’t you?!
To help you get the right decal in the right place decals are numbered in a similar way to the parts, take your time though as decals can be left and right hand oriented and be for different versions of a car. Over time modellers build up a bank of spare decals just as they do spare parts.


Here are several examples of decals needing to go on during the sub-assembly stage as well as examples of how decals can be made to conform to difficult multi angled surfaces. Note the way the number 15 decal backing has had to fit over an air scoop.
The application of the decals will be in the instructions but most are of the simple water activated slide type. Simply put warm water in a bowl and, using tweezers, lay the decal on the surface allowing the backing paper to soak up water and activate the adhesive.
Use the backing paper to position the decal and slide it into place.
Don’t let the decal soak too long and come off the baking paper. Decals can easily fold up and become un-useable after floating unsupported. Some modellers prefer to put kitchen roll on the bottom of a shallow bowl and use just enough water to soak it in order to avoid this separation occurring.
If the decal sheet you are using is old you may be better served to use a deep bowl and warmer water. Put the whole decal under the hot water so it is all soaked at the same time. This will reduce the risk of some areas of a decal sticking as the paper curls up and causing the decal to crack and break up. Leave it for a few seconds and once it stops unrolling lift it out and lay it flat in a shallow puddle on your cutting mat.
If the decal is already looking cracked and there are no alternative decals available you can coat the decal with a clear varnish before soaking the decal. This will help hold it all together during the soaking and application phases.
Simple rub down decals like Letraset can be used to make your own decals. Here white lettering was rubbed onto clear decal paper to make the ‘Labatts’ decals for this driver figure.
There are two types of decal setting solutions that can be of use in applying decals.
- First are setting solutions that soften the decal a little but are primarily designed to expel air from under the decal and aid adhesion.
- Second are full strength softeners designed to help the decal stretch and settle over compound curves. These can wrinkle up the decal alarmingly and if you try moving the decal too much it can stretch into an un-recoverable shape. Make sure you read the instructions on the bottle! If the decal does wrinkle don’t panic, dilute the softener with water and allow it to set overnight. Patience and experience will be needed in using softeners.
Start with the safer setting solution then move onto softeners using small amounts and give yourself time to observe the effects. over time you will gain confidence and experienced modellers can combine the use of decal softeners and hair dryers to speed the drying process and get brillient results over very complex shapes.
Now we are going to have to talk about paints and painting. This is a large subject area so we moving to a new page to ensure loading times don't go up!