Detailing model cars
In this article we introduce you to detailing. Much of this is replicating what is visible on the real car and the level you can detail to depends on the research material you have.
Through scratch building and a variety of commercially available parts you can bring any car model to life.
At first glance it looks real, but this 1/24th scale model looks so good because of the details. When you really study it you can find all the things that are not quite right but the illusion of reality is present and that is what detailing is all about.
All the cars on this page can be found within the museum web site so you can see BIG pictures of the models.
Start by visiting the halls.
Detailing can be as simply as clever paint work, using bare metal foil or mirror glass to add realism, through adding engine plumbing, wires, nuts and bolts, to complex re-working of kit parts or scratch building new parts.
Two things to bare in mind though, can you get enough research material together to guide you and do you have enough time to do all this extra work.
Patience and resilience are the most important requirements at this time. Skill, knowledge and confidence you will gain over time, but only if you keep on trying and allow your self to develop. In time you will build up a collection of models that will allow you to see for yourself how you have improved, don’t be too hard on yourself in the beginning as it does take time and every model maker has had to start at the bottom and work their way up, as you can see from our models.
Model making is a hobby for most people so do what you enjoy and what pleases you.
Lets start with detailing through the use of paints.
This engine assembly was originally sprayed in one colour of metallic silver, then differing stains were applied to slightly alter its metal shades. A dark wash was then added to give depth before some drybrushing and careful painting picked out the details.
Note also the dirt and heat stain build up on the brake drum.
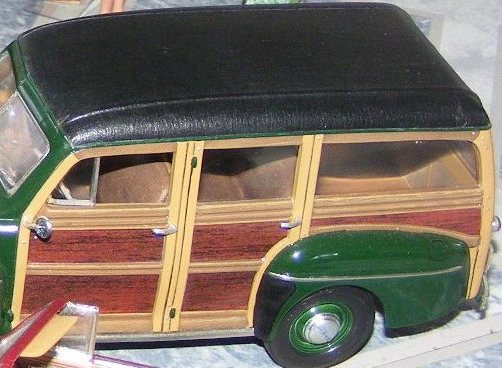
This woody has decals for the main panels but what really makes the effect work is the different shades of paint used for the supporting members. If you look closely you can also find the bolt heads at the joints too. Done with dots of paint.
What we can also see is the next level of detailing, vinyl has been added to the roof in three strips to simulate the manner it was applied to the original car.
Bare metal foil has been used around the windows and on the body ribbing, this adds to the realistic look.
Chrome seldom looks right when paint has been used because the paints have metallic flakes which polished chrome doesn’t have.
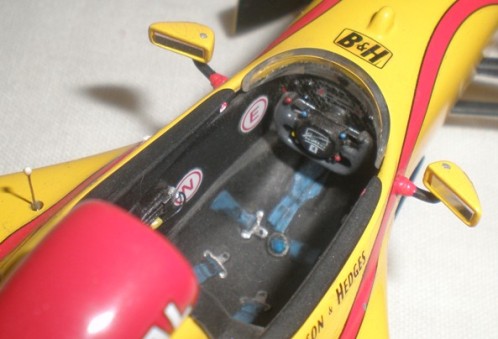
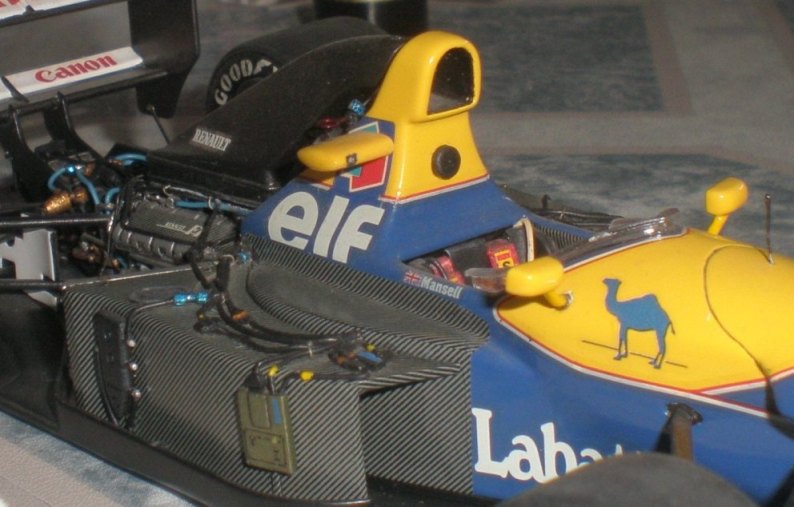
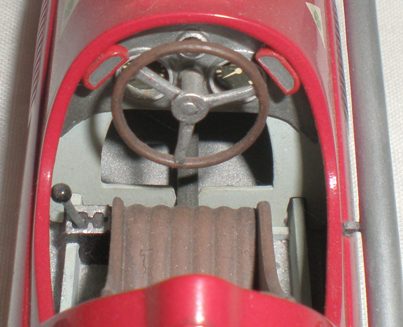
Taking a look into this Jordan cockpit we can see another combination of detailing levels to give a more realistic look. Matt and satin black backed up with carbon decal on the dash and clever painting of the buttons start to give us the feel of reality. The locking nuts on the mirrors and the pull tab details on the head rest have also been painted on. Paint has been used to replicate the plastic top on the data aerial too.
The next level is the addition of mirror glass and tobacco decals and finally the radio box visible on the left side of the cockpit was scratch built and wired in.
The wood effect on this Itala is all done by paint work. The kit is very simple, being a Shell oils promotional kit from Italy, so the paint work is what brings out the details and makes the model look so much better than the kit is.

The technique starts with putting on a cream coloured base coat.
Then, using a very old battered brush , lightly draw the brush across the base coat using a dark ink to give a graining effect.. This takes a little practice to get the feel right and the right amount of ink on the brush. Too much and it runs everywhere, too little and the grain effect breaks up and doesn’t go all the way across.
Finally build up successive coats of Tamiya acrylic clear orange. This is to taste, and each coat must be given plenty of time to dry, when you are happy with the look, stop.
To vary the wood shade use a lighter or darker base coat.
Combinations of the levels of detailing can again be seen here.
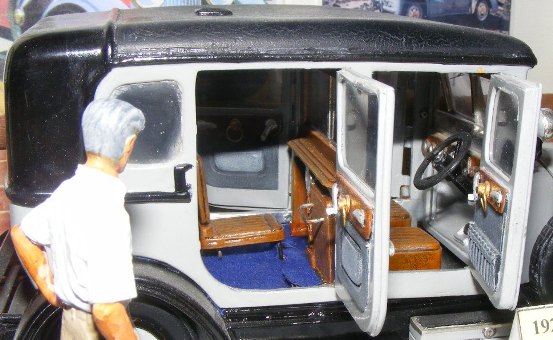
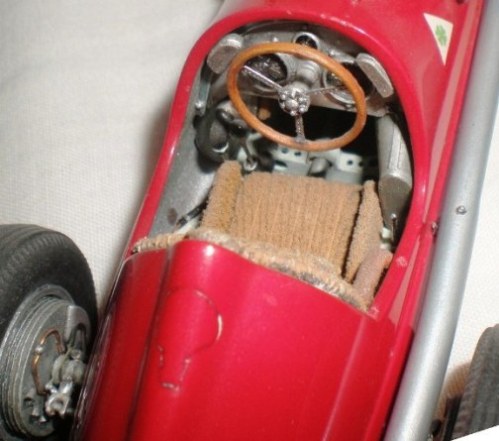
Carpet has been applied to both these cars along with Bare metal foil and scratch built or generic details added.
The Lanchester is totally scratch built but notice not only the door pull handles but also the door pockets, particularly the pleated front door pocket.
Cloth effects can also be obtained through painting, as on this cars roof. This is done by the spraying from further away so the paint starts to dry before getting to the subjects surface, resulting in the orange peel effect we usually want to avoid, but here looking like grained leather on a roof or seats.
Using dry brushing and ink washes enhanced this effect even more.
Another way to use paint for cloth effects is to apply a heavy coat of paint and before it dries stipple it with an old cut down brush. This will give a rougher, grained, effect as on the seat and arms of this Benz prototype.

The Vauxhall also demonstrates the effects obtained from dry brushing and ink washes. On this occasion two ink washes were used as well as the dry brushing. After the block painted colour was sprayed on a dark ink wash was applied which settled into the creases. Once the ink was properly dried a light brown shade of Citadel acrylic was dry brushed onto the highlights.
What we then have is an unreal mix of the satin sheen of ink wash in the creases and a matt look of the acrylic paint on the highlights, if anything this should be the other way around. By applying a second was of chestnut brown ink (rather orange in hue) the whole seat becomes a more consistent colour with a satin sheen all over while still exhibiting light and shade.
The use of bare metal foil on the Vauxhall Prince Henry isn’t kept to the bonnet and radiator but is on the running boards too. Washed with thinned matt black paint it has more reality about it. Adding proprietary products like foil, carpet, roof vinyl and mirror glass are the second level of detailing. Also selling the illusion of reality are the rivet heads on the mudguards where the stays are secured.
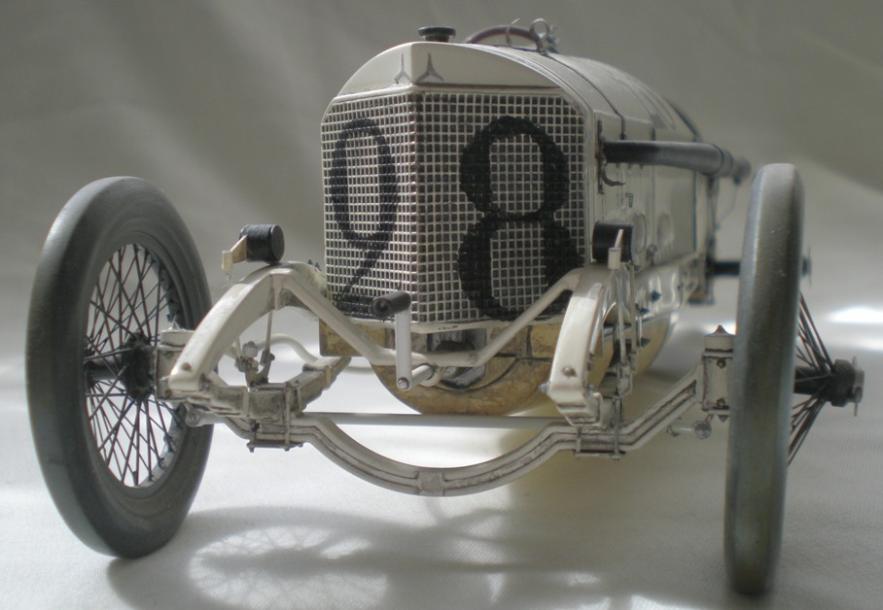
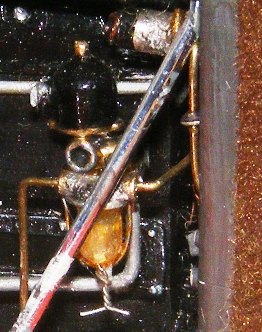
On this 1914 Mercedes can we can see a different combination of detailing techniques.
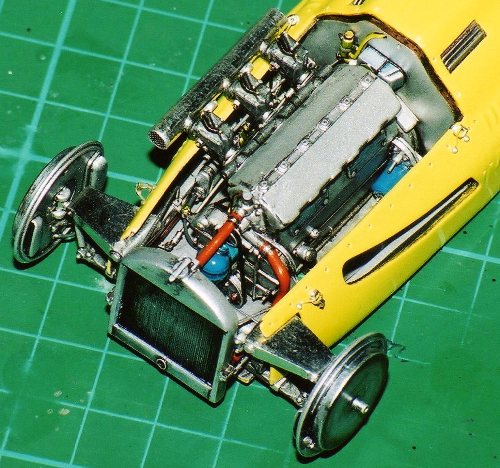
The original kit is very basic lacking any real detail. By studying pictures and using NBW’s, from the Grandt line range, chassis detail can be added. Remember things seldom just go together without a pin, bolt, nail, screw or fixing of some kind. Picking out these items brings a model to life.
By using ink washes to add shade and dirt around the details, underside and nuts and bolts the details can be emphasized.
Other easy to do detailing is hollowing out things like exhaust pipes, in this picture it’s the starting handle that needed to be hollowed out! Simply drill a hole, enlarge and refine it as needed with a larger drill bit dental burr or scalpel point. Modifying kit parts to enhance their detail is the third level of detailing.
The 3-pointed stars were covered with bare metal foil to help them stand out and the radiator itself had a stone guard of brass mesh scratch built. Although not visible in this picture the securing brackets for it were also replicated.
The axle shackles and friction dampers were all scratch built from plastic rod and strip. Adding parts not in the kit, wether from specialised sets or scratch building, is the fourth level of detailing.
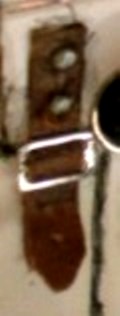
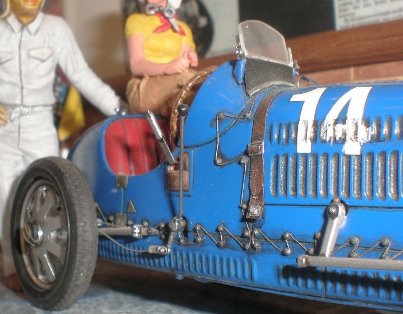
When it comes to straps several methods can be adopted.
On the left we have simple painted and cut to size masking tape with a photo-etched buckle and dot rivets from generic detailing sets.
On the right real leather has been scraped down as thin as possible and brass wire buckles scratch built.
The side roll on the “Roi de Belges” has been made from plastic carrier bag, cut to size and rolled up, use watered down PVA glue within the roll to secure it. Another good material for this sort of thing is ordinary kitchen foil.
Generic detail sets can also be put to other uses than that originally intended. On the left we can see where four hole wiring loom parts have been modified to make the bonnet catches for a Lago-Talbot.
Also evident is the use of grey plastic rivets from the Grandt line range. These are meant for railway modelling but can be used successfully by car modellers too.
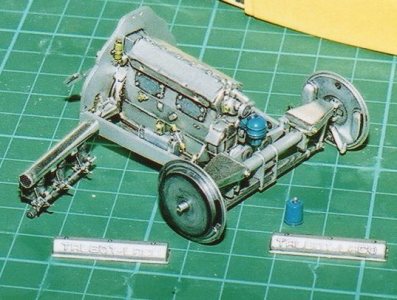
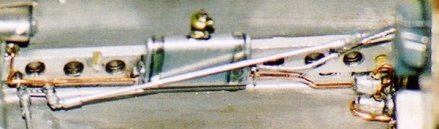
A generic throttle links set provided the parts for the Lago-Talbot induction unit (below). Individual parts are held in place by hex NBW’s from the Grandt line and Model Dr. ranges. The linkages are 5amp fuse wire, simple cost effective and good looking.

New specialist sets of photo etch parts, as well as generic sets, are coming on the market all the time. Along with white metal, turned Aluminium and resin parts sets too. This means if you are not in the mood for making your own detail parts you can probably find what you want some where on the Internet.
Might cost you postage and time, or might just give you ideas and motivation for scratch building.
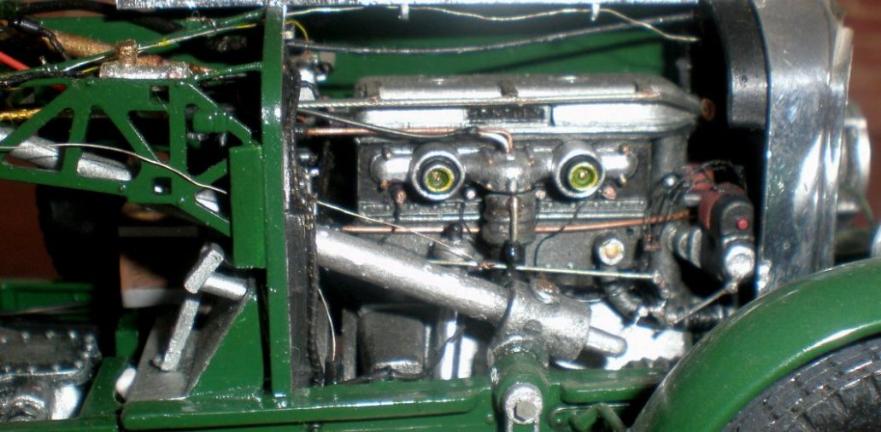
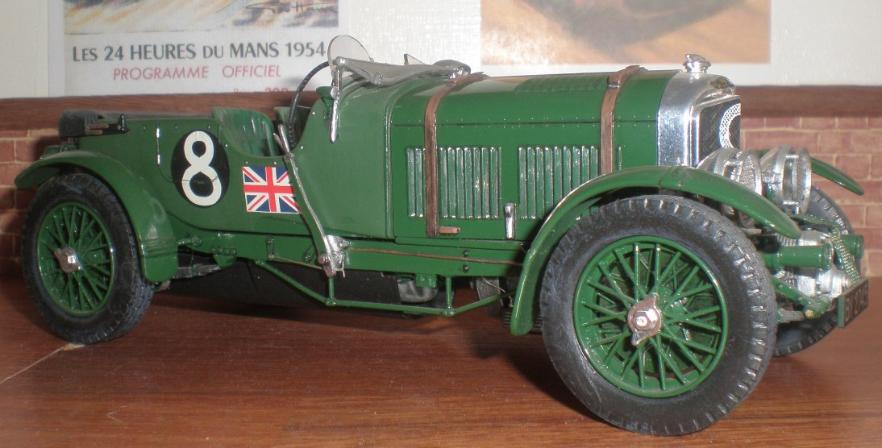
The Bentley engine bay was detailed using p.e. Parts from several generic sets, fuse wire and some scratch building.
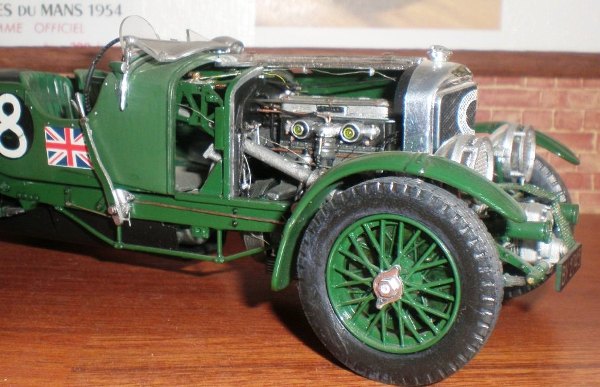
The clear plastic kit lens protectors were drilled out and proper mesh added for realism. Also evident is 15amp fuse wire brake rods and 5amp fuse wire was used to make the handbrake adjuster butterfly.
More pictures of this car can be found within the Museums halls.
When considering wiring for engines our "first" advice is think carefully about what you need, aftermarket parts can become very expensive.
Before you throw anything electrical away have a look inside for any wires that may be of use. Scale thickness is important so thin wire from mobile phones and games consoles can be really cheap and effective way of building up a stock of coloured wire.
Secondly we have gathered our 'stock' of wires etc. over many years but generic sizes or sets usually provide the best value for money as you can use them on several car projects not just one, also we use a lot of household odds and ends, fuse wire etc, under the maxim that 'if it looks right it is right'. Might not please the purists but it is a hobby for most of us and as such enjoyment and cost effectiveness are important considerations. (fuse wire is good for fuel hose as if you roll it out flat under a steel rule then do the same under a fine file the file leaves an imprint in the soft metal wire that looks as convincing as any braided hose I have seen, especially in small scales, also the type of gold braided string they hang chocolate Christmas decorations on trees with can be painted and used for braided hose).
Thirdly regarding sizes, a 1/24th scale 3/4'' tube is 0.7mm so for plug leads you need something around 0.3-0.4 mm - HT lead perhaps 0.5mm. Copper wire in 0.3mm is good for fixed brake pipe and clear or 'yellowed' pipe or wire in 0.4mm is ok for fuel lines to injectors and carbs. As for braided hoses I keep two sizes, 1.1mm and 0.8mm mostly for high pressure hose. I keep some 0.2mm lead wire from plus model for all other wiring but it is rather fragile and 5 amp fuse wire does the job just as well and with less breakages. In fact a card of fuse wire in 5amp, 15amp and 30amp can prove very useful for modelling things on cars, the thicker ones can be used for suspension arms/links, wrapped around cocktail sticks or similar to make springs as well as simulating hoses or being put inside tubes to stop them collapsing in the curves.
Wiring is supplemented by hose ends and fasteners. These really set off the hoses and electrical fittings much better than a bit of wire disappearing into a hole. This level of detail is what really brings a model to life. Just take some time to think about things, if there is a tank it must have a mounting of some sort, a method of filling (and draining) and inlet and/or outlet piping. Just make what you can see!
As can be seen from these pictures from a Lago T26c also demonstrate how important it is to plan your build. We very often find we have to manipulate the building process and take things stage by stage working from the inside out.
What is also evident from these pictures is how the different levels of detailing can compliment each other. Kit parts have been improved and new parts fabricated, while careful detail painting helps bring it all to life.

Remeber too that if you are going to add brake dust and heat stains then exhaust heat and dirt stains are very likely to be present too, particularly on pre-1990s Grand Prix cars.
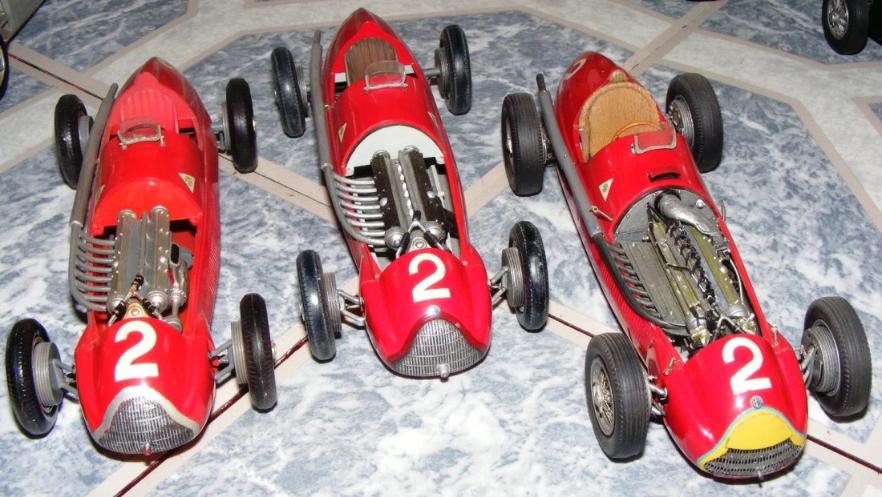
Demonstrating the effects of detail upon a model, here we have three versions of the Merit 1950 Alfetta. To the left is Rod's first ever model car. In the centre is Ian's interpretation of the Smer re-release of the Merit kit, building his in the mid 1990s using much more modern paints and techniques, but still as the basic kit. On the right is Ian's totally reworked version of the kit where hardly a part has escaped alteration of some sort. Note the new open front grill and the starter rod poking through!
Using all the different levels of detailing Ian in the end built a whole new chassis with all the wiring and plumbing throughout.
As can be seen the original 1950s kit actually had a reasonable level of detail, more than that it is pretty much accurate! That said Ian took his research much further in order to reproduce a 1951 version of the car, featuring extended fuel and oil tanks. Mirror glass and cloth seat covering add some realism but the paint and washes really help with the depth and sense of reality.
Note also the scratchbuilt detailing on the left rear brake drum and suspension.
The ultimate in detailing. Full engine and chassis plumbing and all the kit wheels have had their plastic spokes replaced with wire ones (this process is explained on a seperate page within the site, see the articles and projects page).
Rod then hinged the bonnet so it opens and closes as well as making new seat and spare wheel covers.
While much of the wiring and piping are household items generic p.e. parts have also been pressed into service. Most p.e. sets come with detailed instructions for their use but don't let them limit your imagination.
So how far do you go? Well, in short as far as you want, and don't be limited to thinking you have to have specialized expensive aftermarket parts. The glass fuel filter cup on this Delage is made from clear sprue frame, Tamiya clear orange paint and 5amp fuse wire.
Remember our scratchbuilding pages, make what you can see. If there are limits to your detailing it will be firstly, what photo' references you can get? and secondly how much time you have available, without doubt all this extra work does take much more time.
Also considered amongst the time issue must be planning time. Knowing what you want to achieve, and how you intend to achieve it, early on in the build will save time later. Ian is famous for his rough sketches and lists, but having a clear plan really helps if you are going indepth with your detailing and scratchbuilding.

Sometimes you just can't find the reference photo's you want, or you just finished a 6 months long project and want to finish the next model a bit quicker.
Maybe you particularly like the lines of a car and don't want to break them up by having body panels off.
The answer is to focus on the external, visible details rather than the engine.
This Bugatti T35b is a lovely kit by Monogram, but by shaving off the moulded on detail, drilling the holes and fitting body pins, followed by the wire fixings, the car really comes to life. Further additions include replacing the kit brake lever with a dress making pin and the plastic gear lever with some flat brass (actually sanded down framing from a p.e. set) and using masking tape and generic p.e. parts for the bonnet straps.
Of all the detail parts on the model it is the final wash of dirt and shading that gives the illusion of reality that we seek.
The engine was omitted from this model, but nobody has ever complained about that yet.
Another Merit kit from the 1950s, the Maserati 4CLT. It has been improved by having it's grill opened out and a new radiator fitted behind it.
The process for opening out such moulded grills and vents is to thin the part down from behind (either by sanding or grinding, if you have a minimotor tool and dentists burrs) then slowly open out the slots with a sharp Exacto blade, very carefully!
Bare Metal Foil has been used to add a more realistic metal look to the front grill. All these little touches in combination add up to something pleasing to the eye.
Still thinking of the visible details thin fuse wire, guitar strins and an electrical resistor were all put to work in this de Dietrich of 1903.
The lamps have wire handles, the bonnet has wire T clips and although no engine excists above the chassis members everyone would assume it is there from teh wealth of visible detail.
Kangaroo decals of Australia privided the pin stripe decaling, several different colours are available.
One other thing that sells reality is appealing to an individuals personal memories by adding things that can be expected to be seen on a particular car. This can also mean highlighting features of the original vehicle.
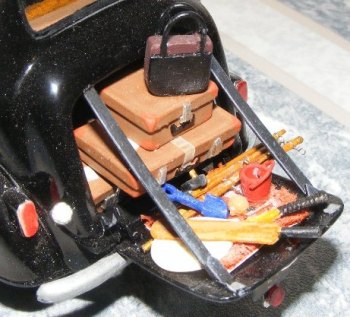
The Ford 'Popular' was a common family car and many people have enduring memories of their family, or of neighbours, getting ready for a trip to the seaside. All this lugguage is scratchbuilt, not only does it prompt visitors to the museum to remember the sight of overloaded boots, but also that the rear number plate and reflector were designed to fold down so they could still be seen while the boot lid was providing its extra capacity!
Our final word on detailing is this. Much as with scratch building, be prepared to amass a wealth of odds and ends, spare parts and stock plastic...... The first bit of planning ahead might need to be
"Where am I going to put it all!".