Scratch building, page three.
Nuts and bolts, handles and hinges, there are many utalitarian bits and bobs that must be represented on a model, and some of them can be a little tricky.
Nuts and Bolts.
These items feature all over cars and in all era’s, it’s not magic or faith that holds everything together, so we have to be able to put them on our models. They come in so many sizes that scale matters less than what looks correct, sometimes a small circle cut from rod or a tiny photo etch dot will be enough to fool the eye into thinking there is a nut, our minds often fill in the blanks if we give it enough pointers to follow, and it’s this illusion of reality we are seeking.

Anyone who has tried to cut a hexagonal shape from flat card can tell you how hard it is, so trying to do it in small sizes is a real trial.
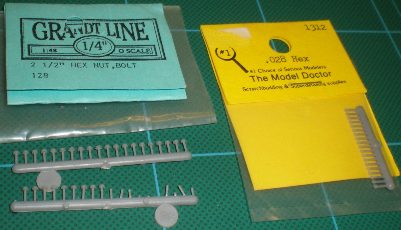
Fortunately we don’t need to. Historex (and others) sell a hex’ punch and die set. It is easy to use, gives four sizes of hex’ and won’t run out as long as you have plastic. They are a little expensive but well worth it if you are doing a lot of scratch building or detailing.
For those who are less adventurous (and have plenty of money), you can buy photo etch, plastic resin or even milled metal nuts, bolts, washers and rivets in hundreds of sizes and styles.
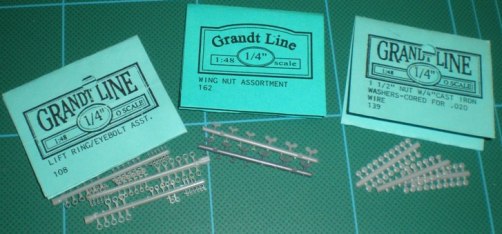
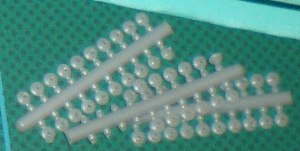
Grandt line railway details are easily available in the USA but not so in the UK but they are worth searching out. Not just for the hex’ nut-bolt-washer sets (NBW) but for all the other details they do which can come in useful for scratch building. Below are eye bolts, wing nuts and pre-drilled NBWs.
Model Dr seem very hard to find now which is quite a shame.
Attaching plastic hex’ shapes to your model is straight forward unless you are gluing plastic to resin. You may wish to mark the places you want the nuts to go either by pencil mark, small knife scribed mark or shallow drill hole. This will help keep any rows straight too.
Fitting Grandt line or model doctor style NBWs is simply a case of drilling a hole and gluing them in place. Liquid glue can do this but over the years we have found gloss varnish does the job quite well too, especially if you are painting over after the building.
It is possible to cut them off flat to the nut and just place them on using a knife point. Using clear acrylic varnish will give a little time to position the parts.
We don’t recommend super glue for any parts of this job, whatever style of nut you are using, as it can be very messy and often grabs before you have got the part in the right place.
There are all sorts of other providers of detail sets from China, Japan and eastern Europe. Specialist online car kit sellers usually have these lines or links to them.
Don’t ignore the military sites too as there are generic sets which can be useful too.
Search online for the model car garage, Sakatsu and Studio 27 web sites and you will find huge ranges of detailing parts as well as nuts, bolts and rivets.
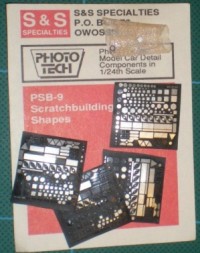
S&S specialties scratch building shapes p.e. set was so good I’ve had four of them.....
They contain many sizes of hex’ as well as many other useful shapes. They don’t seem to be in business any more but some of their products are still around although easier to obtain in the USA.
Take a look through the halls and you will be able to find plenty of examples of the use of all these styles of hex’ nuts on our model cars.
Doors and hinges.
When it comes to scratch building doors it will depend on the door style how you approach the problem.
Do they need to open? Are they flat or do they have shapes in them? And so on.......
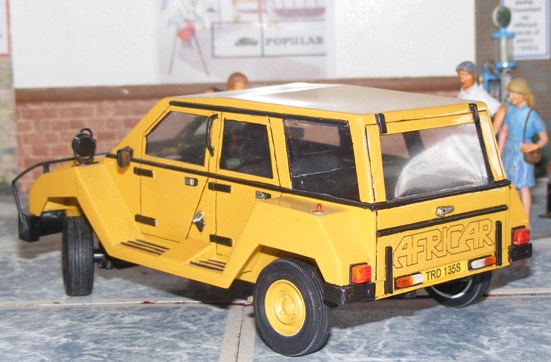
The Africar was all very flat so it was easy to scribe the doors into the flat plasticard sides, the door marks were emphasised at the end of the painting process with dark ink.
Hinges were eighties style flat units so easy to replicate with ‘Evergreen’ strip and rod.
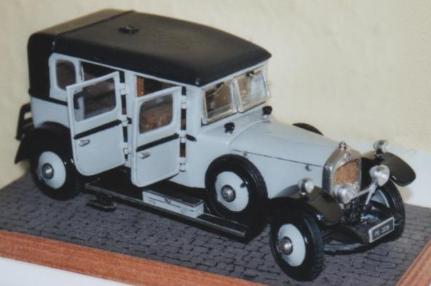
For the Lanchester ‘Forty’ the doors were made in layers to give them depth and allow for the fit of the door into the door recess. Building the doors up in this manner means door pockets can be given depth and any interior shapes can be built in.
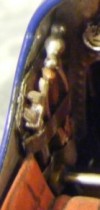
Note the door hinges are more like the sort of barrel hinges we see in house hold doors and are made in a similar way. Evergreen tube is sliced to the length of the length of the hinge, cut in half and the Evergreen rod pin inserted into one half.
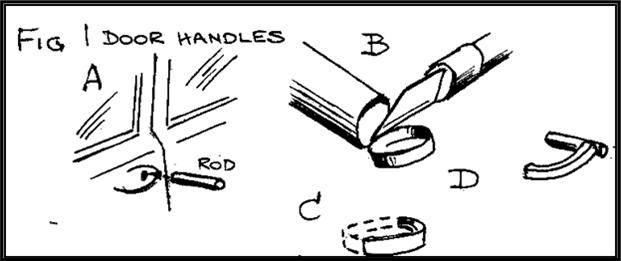
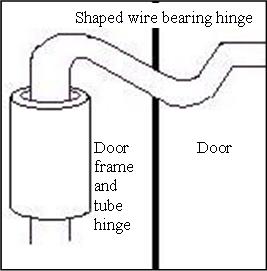
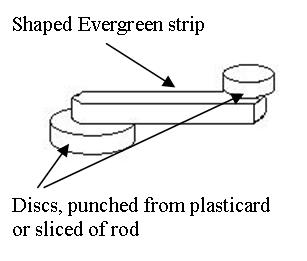
Door handles can be effectively made from tube and rod as in the diagram to the left. This technique can be used in renovating old models and in detailing cars which have solid handles moulded into them.
Remove the moulded item by cutting and sanding, then drill the end that has the operating button and/key slot. Slice a tube of the necessary diameter and cut it in half. Spread the half circle and glue it to a length of rod. Ensure you have enough rod to locate the door handle in the hole. Glue, sand and paint!
An old technique that still works well for opening doors, bonnets and boots is the use of a tube and shaped wire. In the ‘old days’ a tube would have been made of glue soaked paper wrapped around a wire core but these days we have plastic tube. The tube part is fairly obvious but the shaping of the wire is most important. It must be angled to clear the door frame when the door is opened. Take account of where you are placing the wire hinge. In the past it was acceptable to surface mount the hinge but now we want things to look more realistic. It is possible to recess the hinge tube and operating wire into the body and door, it takes a little time to scribe the position and sand in some groves to allow the recessing but its worth the effort. Sometimes it may be possible to sandwich the hinge between door skins and between body-interior panels.
For some cars (usually race or rally cars) it is possible to purchase resin replacement doors and photo etch parts to model doors in the open position. These have the relevant interior detail on them and this is a point to remember, if you are going to open up an area of a car you need to have the right details on the inside of the panel as well as in the interior area, engine bay or boot space.
Interior details.
Interior details really help bring a model to life. Often moulded onto panels in kits, any model can benefit from some creativity on the inside.
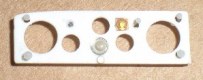
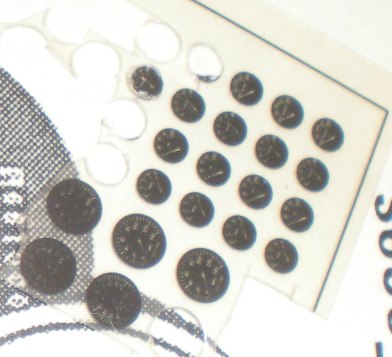
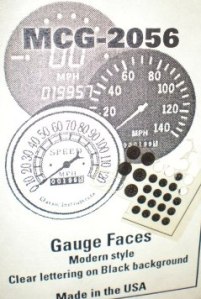
Dash boards can be detailed with photo etch and aftermarket parts. The most notable item on a dash is the instrument dials. Decal sets are available and sometimes they are very good but the most convincing sets are from model car garage. They consist of printed dials on clear acetate. This allows you to paint on colours behind the dial and make them look real with red lines, coloured light indicators, the works!....
On older cars instruments are surface mounted but increasingly dials became recessed and one way to replicate this is to drill the opening and put the dial or decal behind the dash, as illustrated by the Jaguar XK120 dash, above left.
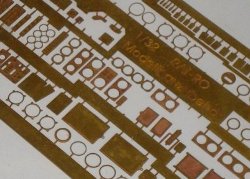
Model car Garage offer modern, digital and vintage style dials in black and white. An excellent product for detailing and scratch building. Also bezels can be made from Wizard of O’s sets and from military sets like the brass one above from Rai-ro which has lots of interesting shapes for cockpits which can convert to car dashboards, or engines for that matter.
See the article on the Peugeot T16 to see how the interior parts were made for this rally car. Without them this cabin would be very sparse.
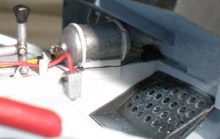
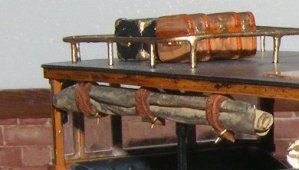
On the right is a photo of the tool set in a Bugatti 35b. While the tools came out of the spares box the leather case holding them had to be scratch built from masking tape.
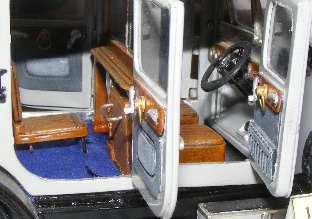
All the detail for the Lanchester ‘Forty’ is scratch built.. Evergreen plastic strip can be layered and shaped to provide panels and shelves as well as seats.
This layering effect is evident in the doors too. Both in the basic construction and the detailing. The flexibility of evergreen strip is limited only by imagination while the same rule applies over and over.
Look at the item, break it down into simply shapes, then make the shapes and put them together.
You can use photo etch shapes or punch discs out of strip and card to make window winders and door handles.
How much you want to shape, or multi layer the parts to detail them, is up to you. You could even try turning rod in a mini-drill to add shaping, then slice it off the end of the rod. Our face book page has some examples of this.
What you make to use the shapes you see is the real variable. Anything that can do the job is fair game, you’re making a model so what looks right is right. You may have to consider weight and strength issues when deciding what materials you can use but other wise as long as you prime the surfaces prior to painting you can use anything you can get your hands on.
The pleated front door pocket was made from plastic strip but could have been made by folding masking tape or tinfoil from a pie, it’s all a matter of what you feel is easiest method and you are most confident to have a go at.
Make sure you check as many references as you can to be sure you are making the right shapes, sometimes optical illusions can occur due to shapes and lighting conditions. As we have said before accuracy is a matter of how far you want to go but it makes sense to double check things, it often saves time in the long run.
The Lanchester 'Forty's rear door pocket is scribed into the thin card panel with the tip of a sharp blade. Mark out the pattern with a pencil first to be sure you know where you want to scribe.
Simple switches can be made from photo etch sets but also using fuse wire and sanded down hex NBW’s. Knobs can be made in a variety of ways depending on the shape needed. Simple turned knobs can be sliced off a length of the appropriate diameter rod, rounded wooden pull knobs can be turned in a mini-drill or made by repeatedly dipping a length of wire in superglue. Mushroom shaped pull knobs can be made by sanding Grandt line rivets into shape (as on the dash’ above). That leaves only modern flush and soft touch switches which are easily made from cutting plastic strip and/or scribing.
Seats, Hoods and covers.
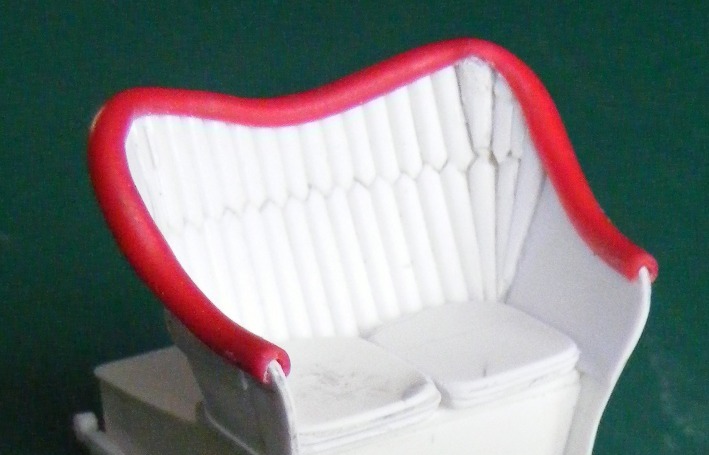
Seats are very visible on almost all cars and as they are very familiar to us they need to look right. There are several ways to make seats depending on the style required.
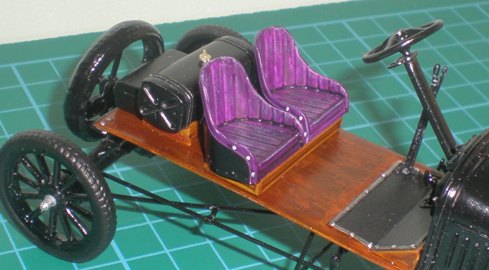
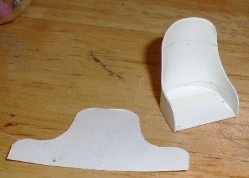
The seats for this Ford T speedster were made first in paper template form. This was transferred to plastic when the desired shape was achieved. (paper is easier to cut and trim than plastic).
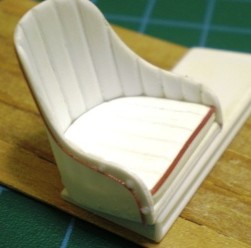
After the base was made strips of Evergreen were shaped and positioned to replicate padded pleats. Fine plastic rod was shaped to give beading glued in place using small amounts of MEK poly.
The base cushion was made from thick card and then strip was shaped and applied for the pleated parts. The final touch was the beading made from thin rod from the ‘Slaters’ range.
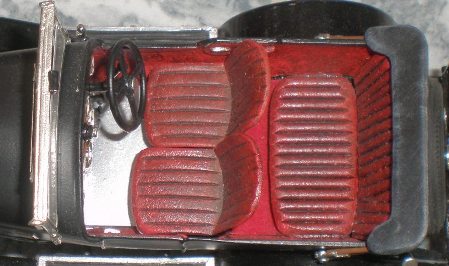
Plastic rivet heads gave the silver fixing pins. Around the base of the chair small dots of ‘Gator grip’ replicate more fixing pins. These are harder to see and are the same black frame colour. Sometimes half round strip is better than flat strip for replicating pleats. The rear seat or this Bentley, below right, have half round strip shaped and sanded to form the rear seatback and cushion. As it has more depth you can shape in the wear patterns too. Padding gets crushed and leather stretches when a seat has been used extensively.
The seats of the 1904 Darracq have been made to look worn by sandwiching a square frame between two thinner flat sheets . Overloading one of the flat sheets with liquid glue softens it enough to induce sagging in the middle of the seat cushion. Once the glue has dried all that is left to do is some careful sanding.
Patterns can be introduced either through cutting strip into points and shapes, or by scribing with a knife as in the two lower pictures. Start by marking out the pattern in pencil then scribe it in by knife and steel rule.
Evergreen rod has been cut into tiny slivers to give the button detail.
The use of glue to soften a surface and then stippling it to give a rough, more cloth like, surface is also available to the modeller. This effect can also be replicated by rough painting of a base coat of acrylic paint. Acrylic paint dries quickly so if you keep working it as it dries it roughs up.
If you use spray cans you can achieve a similar effect by spraying from further away. The paint starts drying before it gets to the surface to be sprayed and blobs up giving the orange peel effect not usually wanted but useful for replicating leather.
Another effect for bringing seats to life is using washes and dry brushing. See the painting section of how to build a model car for more information.
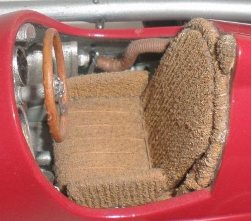
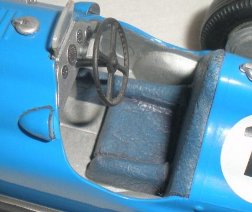
The final way to improve seats is to cover them with real cloth. The two examples above show this. Both are in 1/24th. scale and both were still sealed and painted to get the required colouring.
The Alfetta seat is covered with the ribbed part off the top of a stocking while the Talbot-Lago seat is covered with leatherette cloth scraped as thin as possible. Both these materials were simple household items with no major cost outlay.
Hoods and covers.
Hoods and covers can be made in much the same way as seats. Paper templates often help to give a good guide on the size of material needed for the cover or hood. As mentioned it’s easier to trim than plastic, tin foil, cloth or tissue, all of which have a part to play in replicating hoods and covers.
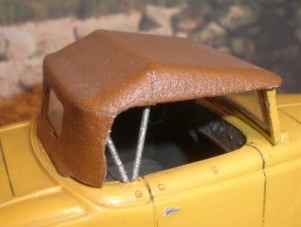
This hood was made in the 1960’s from leather, an improvement over the plastic kit part. Scrape the leather down as thin as possible before attaching it to a wire frame. These days super glues make this a much quicker, though no less tricky, process.
Remember paper templates can really help when working out the size and positioning of cuts.
This hood was made from doped tissue spread over a wire frame. The wire frame was made to the dimensions of the kit part. Tissue is lightly attached to the frame with PVA glue then the tissue is soaked with watered down PVA applied by paint brush.
This must be done carefully as too much water and the tissue will of course split. Once the watered down glue dries it is quite strong and hard, easily painted by brush.
Folds can be introduced during the soaking phase and the texture of tissue will help it to look more like material or leather when it dries.
Ink washes and dry brushed highlights help add to the illusion of reality.
Rolled covers can be made from polythene bags, tin foil or paper.
Polythene is easy to roll but doesn’t retain the rolled shape very easily. Using PVA glue helps, super glue usually end up all over your fingers rather than where you want it.
Tin foil is thin and holds it’s shape but is harder to roll and if rolled and unrolled too much starts to crack and break up.
Cloth is often too thick and bulks up to look overly large and unreal.
Tissue or paper just becomes to sodden and tears up while you try to handle it.
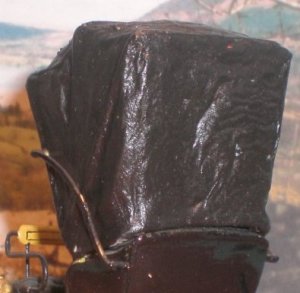
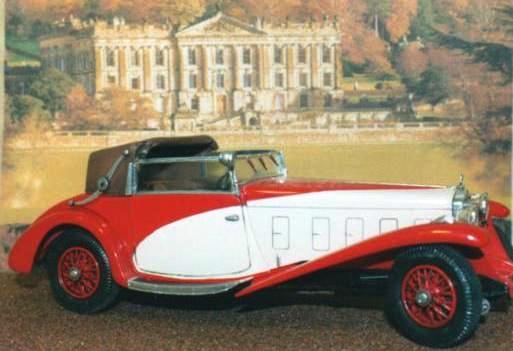
The two rolled hoods here were made from polythene, secured with PVA.
The leather straps and wire buckles give more visual appeal but care must be taken to try to get the leather as thin as possible in order to look realistic.
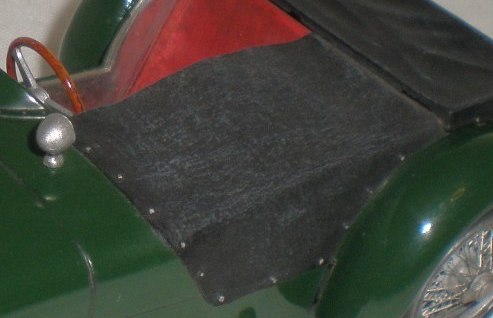
When racing Lotus Sevens’ often had their tonneau cover fitted while racing and this one was made from masking tape. It has the advantage of sticking itself to the model thus avoiding risk of glue runs and pills. The press stud fasteners are simply dots of silver paint.
The textured surface of masking tape is ideal for leather look covers but it can be tricky to trim while fitting. Dry brushing helps pick out the high details.
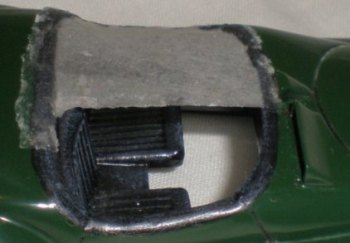
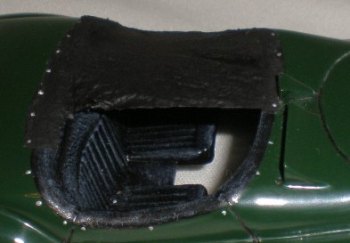
A 1/32nd scale Jaguar XK120 conversion with it’s half tonneau cover in situ.
The cockpit surround was applied first consisting of strips of tissue set in place with clear acrylic varnish. Acrylic varnish can be watered down just like PVA but is even easier to remove if it runs or spills and it shrinks as it dries so it never detracts from any surface texture or folds induced in the tissue.
With the cockpit surround dried and painted a paper template was made and the shape transferred to tissue paper. This was attached and doped with clear acrylic varnish as the surround had been. While wet the tissue sags but it pulls itself taught as it dries to give a realistic effect.
The final painting was with differing shades of black to make the tonneau stand apart from the surround. This is a matter of adding a little blue or grey to one or other of the two areas. Once again dots of silver paint replicate press studs.
Conclusion.
After three pages of information, tips and ideas we hope you feel confident enough to have a go at some scratch building yourself. Start with some simple detailing parts and work your way up bit by bit as you gain confidence.
We know some people will not believe us but it really is much easier than you think. As always the hardest part is summoning up the courage to have a go. Once you have started you’ll amaze yourself.
There are two things to remember.
1- The basic guiding principle, study the subject part,
break it down into shapes,
make the shapes,
put the shapes together from the inside out.
AND
2- Making a scratch built model is just like making a kit, only you have to make the parts as you go along.
For any more information or questions please e-mail us at
This page is still under construction,
We are sorry for any disappointment,
Please come back soon and see the progress.
OR
If you have a question please feel free to e-mail us at,
Return to the Articles and Projects page.