
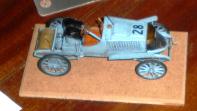
1904 Panhard et Levassor '70' from the "Eliminatoires Françaises de la Coupe Internationale".
The French had an embarrassing number of firms vying for contention in the Coupe Internationale, or Gordon Bennett Trophy, race of 1904. Ten different makes put forward 29 cars and the only fair way to choose between them seemed to be by pitting them against one another to see who was best equipped to represent the honour of France.
Organising the event was the responsibility of l A.C.F. but they were pressurised by public opinion, and the French Government, away from the easy course they wanted towards a 532.76 Km race consisting of six laps, 88.793Km in length, of a much more dangerous course north of Riems, in the Argonne region.
Panhard entered three cars with some unusual features for this race. Visually the interesting radiator shape stands out but this really turned out to be the cars worst point. Far from aiding any aerodynamics or improving cooling the cars suffered from terrible overheating. The Centaure S4m engine was a 4 cylinder, 8 valve, L head unit with a bore and stroke of 6.29 and 6.69 inches giving a volume of 13.6 Litres. This engine design had been very successful the previous year and Panhard had little reason to alter it. The other features were the use of chain drive from the main shaft to the differential and drive shaft, most unusual, and the multi-plate, oil bathed, clutch.
To drive these cars for “the Big winner”, as the marque was called, had Farman, Tart and Teste on the team, drivers of some repute. Farman set the fastest lap of the race with a time of 48'44"6 for the 88.793km lap, an average speed of 109.299kph on lap 2. This was the high point of the race from Panhard's point of view as the overheating problems were so severe that the cars had to stop out on the circuit to cool the engines down, Farman eventually discarded his cars bonnet in the hope this would help, as all the louvers in the bonnet sides, and even running with the cooling flaps fully open, there just wasn't enough cooling airflow to do the job.
Teste finished 7th, 1hr 20mins after the winning Brasier of Leon Thery, Henri Farman was 8th. 1hr 31 mins behind. Both well outside the top three that would be put forward to the Gordon Bennett cup race.
This result marks the end of Panhard's domination of motor racing. Having been the premier marque in France and carrying all before them, Panhard slipped ever further behind Brasier and Mors, never again to hold sway over all the many French marques.
The dismal failure was purely due to overheating, the cars had new honeycomb radiators fitted (returning to Panhard's normal flat front styling), and at the next GP the 3rd Circuite des Ardennes held just over two months later Panhard's were first and second again. From there they went on to win the inaugural Vanderbilt cup in the USA, on October 8th that same year.
How different things might have been were it not for that experimental radiator.


The model
This half-built model was given to Ian at SMW 2009. Apparently finding suitable wheels being the main stumbling point as the chassis, basic engine, bodywork and springs were all done. What was needed was the details and wheels.
The model was painted in a blue grey colour, Humbrol gloss 5 to be precise, which I was not sure was correct. In my efforts to clean off the old paint I discovered how the model had been built so far and caused some damage due to my ignorance, or lack of proper forethought.
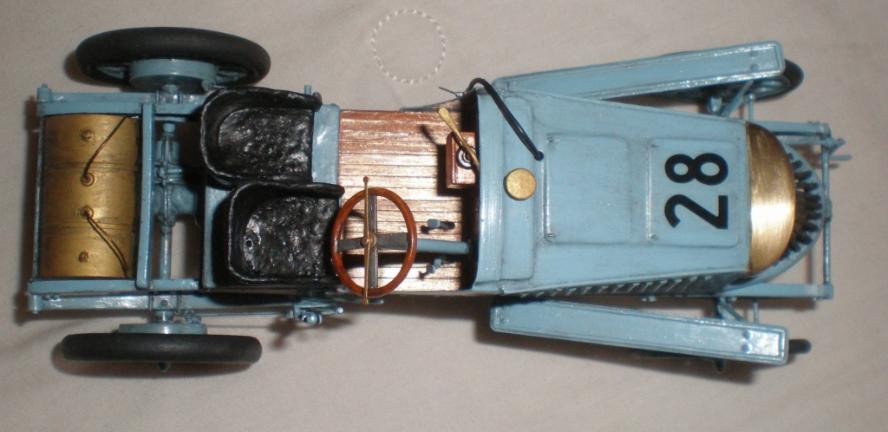
The springs were made of one tin top leaf for strength and then the remaining leaves in card for scale thickness and accuracy, quite clever. The body and chassis were made from drinks can metal built on to a balsa wood base, very clever. Card was used to make the bonnet side panels with various thicknesses of electrical wire used to make the radiator.
After cleaning off as much paint as possible Ian remade the springs repaired some loose body work and used “tipex” (typewriter correction fluid) to fill small cracks and gaps. The seats were particularly covered with tipex which was roughed up to make a textured surface.
The steering wheel was made by cutting the centre out of a modern spare part and making a new centre from plastic strip while the advance and retard levers came from a photo etch set of street rod windscreen wipers! The system pressurising box was scratch built from plastic strip while the lever is fuse wire and shaped plastic strip blended together with superglue and repeatedly sanded until I could achieve the shape required. Unfortunately, Ian could not find any more pictures of the dash board so have been unable to add anything else to this area, that’s assuming there was anything else there anyway.
The cockpit floor was made from a sheet of plastic card, cut to fit and then carefully measured and scribed to represent planking. Slots were made for the pedals to go through extending down through the balsa wood base to tie up with the details under the chassis. The pedals were scratch built from plastic strip. Once Ian had made the supporting bracket for the steering column, out of different sizes of plastic rod, he moved on to painting the wood work. Ian’s usual way to do this is to put down a light base coat, using either cream or flesh colour from the Citadel paints range, then drag a dark brown colour over the base to imitate graining. After that Ian stains the whole surface with brown or orange ink before finally coating the whole lot with Tamiya clear orange. Varying the colours and the numbers coats allows you to create a variety of wood shades.
Ian made a wheel from and old fire engine hose cart wheel, cutting it down to size and using channel section strip to start the rim. Milliput was used to fill the rim and start the unusual shaping. A hub was turned from plastic rod and detailed with rivets from the Grandt line range. These parts were then moulded so identical parts could be cast in resin. Two of the hubs had the rivets replaced with hex NBW’s (Nut/Bolt/Washer) to replicate the wheel nuts on the inner aspect of the hubs. The rear brake drums were converted from old NASCAR units! Electrical wire was used for the tyres interestingly these are different sizes front and rear. Grandt line also provided the wing nuts for the detachable rim locating system.
The operating levers for the brake rods were also made by scratch building one then casting the required number in resin.
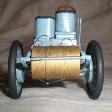
It is a strange layout at the transmission end and while improving the details of the underside was fairly straight forward using plastic rod, strip and the usual array of house hold items the differential was much more of a challenge. I broke it down to the basic shapes having spent several hours studying blurry old photos and the plan drawings. Several discs of differing sizes were glued together for the longitudinal part of the diff’ while the cross-section part was turned to shape in my mini-drill. These parts were then put together on a plastic tube and rod axel before milliput was used to blend them together.
This necessitated some major surgery to the fuel tank. The original cars have an ugly chunk hacked into it to make space for the diff’ and I had to do the same into the already made brass tank that had been made by the original builder. Now it sounded easy to me but proved to more tiresome. The tank was constructed by having put sheet brass over a wood core and I was not a little alarmed when in the middle of grinding out brass expecting to cut into a hollow can Ian started to smell wood burning and though the house was on fire!
More Grandt line nuts and bolt heads together, with copper wire I got from Marshall autos years ago, detailed the tank. Reinforcing bands were made from Trimline tape. The tank was painted with “Mr Metal Colour” brass but I didn’t buff it up to a polished look reasoning that it was at the dirty end of the car and unlikely to stay shiny very long.
I turned my attention to the chassis and added bolt and rivet detail made from Grandt line products and punched out of plastic strip using a Historex punch and die set. Reinforcing plates were made from plastic card as I had lost the ones that had been made by the original builder. The springs were rebuilt and all the parts I had put together. So now I needed a front axle to help get the ride height set. This is actually a fairly simple rod shaped at the ends to mount the hubs onto. The Hubs over lap the axle on this car rather than the more usual axle sandwiching the hub carrier on a king pin layout. Steering is basically by operating rod and drag link again easily made from plastic card and rod, detailed again with hex’ NBWs. This was now attached to the springs and the wheels were put on. The car is almost complete.
The brake and gear quadrant was an interesting build. It has three levers to work alongside only two foot pedals. There is a ratcheted brake lever and under ratcheted gear lever. This mechanism is built around the ratchet at the top of the quadrant. The Quadrant shape is formed from a piece of plastic card carefully shaped and repeatedly checked back against the plan. The levers were made from strip and rod blended together with superglue.
An unusual feature at the front end is the indirect nature of the starting handle. It sits to the left of the chassis and turns the crank shaft by means sprockets and a chain. I made these from some photo etched pulley faces and the string from a Christmas decoration, repainted of course. The whole lot is hidden below the radiator but for the glimpses you do get of it, it looks real enough.
All the way through the building of this car Ian kept trying to find more pictures of the elimination trials, 1904 Panhard, drivers names, Gordon Bennett races etc., as much as he could think of and little by little found a number of pic’s. One was of Farman’s car, stopped out on the circuit, covers off with the crew trying to cool the engine. What was good about the photo’ was that it had the cooling flaps fully open. It was showing off not only it’s race number but registration number too. Excellent details for adding some reality.
Now for the colour. All the pictures Ian found were black and white, even those of the later 1904 cars in America. So how to interpret the notes in Model Cars plans? "Grey-white or grey-blue?" What does that mean? Having several colour pictures of 1906 and 1908 Panhards both in a light French powder blue I decided a similar colour was in order. Humbrol blue no.47 was used, a very old pot, which seemed to stay rather grey blue, especially when dulled down with thinned mat black paint. Decals from the spares box and 'Letraset' white rub down transfers took care of the aforementioned numbers. The tyres were painted with Revell colour no.9, an anthracite grey matt. This looks more like the grey-black rubber of the time than using straight black. I washed thinned matt black around the rims and dry brushed a lighter grey to the high points.
It took a several weeks to build, although much of the time Ian was held up trying to find, and decipher, photos to find out where things went, and out ran out of wing nuts and had to wait for some more to come by post.

